Apache APISIX
背景
Apache Dubbo 是由阿里巴巴开源并捐赠给 Apache 的微服务开发框架,它提供了 RPC 通信与微服务治理两大关键能力。不仅经过了阿里电商场景中海量流量的验证,也在国内的技术公司中被广泛落地。
在实际应用场景中,Apache Dubbo 一般会作为后端系统间 RPC 调用的实现框架,当需要提供 HTTP 接口给到前端时,会通过一个「胶水层」将 Dubbo Service 包装成 HTTP 接口,再交付到前端系统。
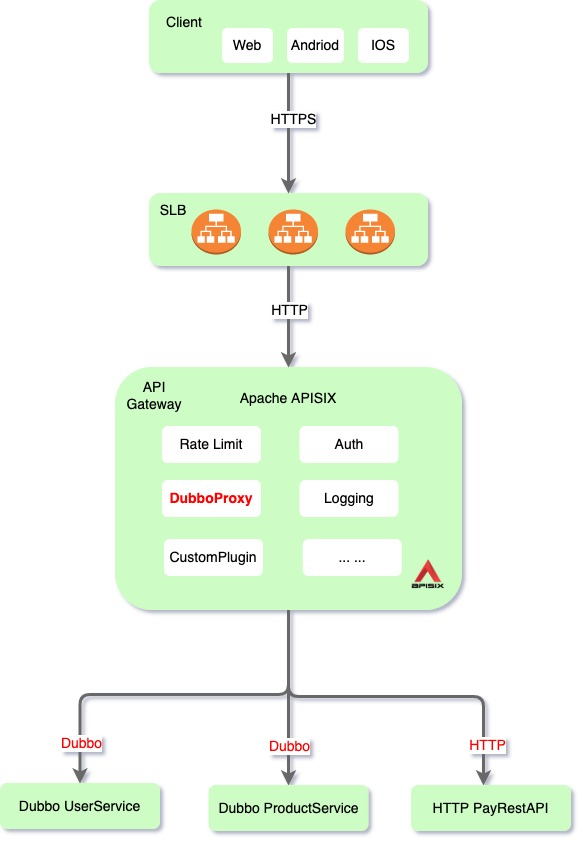
Apache APISIX 是 Apache 软件基金会的顶级开源项目,也是当前最活跃的开源网关项目。作为一个动态、实时、高性能的开源 API 网关,Apache APISIX 提供了负载均衡、动态上游、灰度发布、服务熔断、身份认证、可观测性等丰富的流量管理功能。
得益于 Apache Dubbo 的应用场景优势,Apache APISIX 基于开源项目 tengine/mod_dubbo 模块为 Apache Dubbo 服务配备了HTTP 网关能力。通过 dubbo-proxy 插件,可以轻松地将 Dubbo Service 发布为 HTTP 服务。
如何使用
入门篇:安装使用
这里我们建议使用 Apache APISIX 2.11 版本镜像进行安装。该版本的 APISIX-Base 中已默认编译了 Dubbo 模块,可直接使用
dubbo-proxy插件。 在接下来的操作中,我们将使用dubbo-samples项目进行部分展示。该项目是一些使用 Apache Dubbo 实现的 Demo 应用,本文中我们采用其中的一个子模块作为 Dubbo Provider。
在进入正式操作前,我们先简单看下 Dubbo 接口的定义、配置以及相关实现。
接口实现一览
public interface DemoService {
    /**
     * standard samples dubbo infterace demo
     * @param context pass http infos
     * @return Map<String, Object></> pass to response http
     **/
    Map<String, Object> apisixDubbo(Map<String, Object> httpRequestContext);
}
如上所示,Dubbo 接口的定义是固定的。即方法参数中 Map 表示 APISIX 传递给 Dubbo Provider 关于 HTTP request 的一些信息(如:header、body…)。而方法返回值的 Map 表示 Dubbo Provider 传递给 APISIX 要如何返回 HTTP response 的一些信息。
接口信息配置好之后可通过 XML 配置方式发布 DemoService。
<!-- service implementation, as same as regular local bean -->
<bean id="demoService" class="org.apache.dubbo.samples.provider.DemoServiceImpl"/>

<!-- declare the service interface to be exported -->
<dubbo:service interface="org.apache.dubbo.samples.apisix.DemoService" ref="demoService"/>
通过上述配置后,Consumer 可通过 org.apache.dubbo.samples.apisix.DemoService 访问其中的apisixDubbo 方法。具体接口实现如下:
public class DemoServiceImpl implements DemoService {
    @Override
    public Map<String, Object> apisixDubbo(Map<String, Object> httpRequestContext) {
        for (Map.Entry<String, Object> entry : httpRequestContext.entrySet()) {
            System.out.println("Key = " + entry.getKey() + ", Value = " + entry.getValue());
        }
        Map<String, Object> ret = new HashMap<String, Object>();
        ret.put("body", "dubbo success\n"); // http response body
        ret.put("status", "200"); // http response status
        ret.put("test", "123"); // http response header
        return ret;
    }
}
上述代码中,DemoServiceImpl 会打印接收到的 httpRequestContext,并通过返回包含有指定 Key 的 Map 对象去描述该 Dubbo 请求的 HTTP 响应。
操作步骤
- 启动
dubbo-samples。 - 在
config.yaml文件中进行dubbo-proxy插件启用。
# Add this in config.yaml
plugins:
  - ... # plugin you need
  - dubbo-proxy
- 创建指向 Dubbo Provider 的 Upstream。
curl http://127.0.0.1:9180/apisix/admin/upstreams/1  -H 'X-API-KEY: edd1c9f034335f136f87ad84b625c8f1' -X PUT -d '
{
    "nodes": {
        "127.0.0.1:20880": 1
    },
    "type": "roundrobin"
}'
- 为 DemoService 暴露一个 HTTP 路由。
curl http://127.0.0.1:9180/apisix/admin/routes/1  -H 'X-API-KEY: edd1c9f034335f136f87ad84b625c8f1' -X PUT -d '
{
    "host": "example.org"
    "uris": [
        "/demo"
    ],
    "plugins": {
        "dubbo-proxy": {
            "service_name": "org.apache.dubbo.samples.apisix.DemoService",
            "service_version": "0.0.0",
            "method": "apisixDubbo"
        }
    },
    "upstream_id": 1
}'
- 使用 curl 命令请求 Apache APISIX,并查看返回结果。
curl http://127.0.0.1:9080/demo  -H "Host: example.org"  -X POST --data '{"name": "hello"}'
< HTTP/1.1 200 OK
< Date: Sun, 26 Dec 2021 11:33:27 GMT
< Content-Type: text/plain; charset=utf-8
< Content-Length: 14
< Connection: keep-alive
< test: 123
< Server: APISIX/2.11.0
<
dubbo success
:::note 说明
上述代码返回中包含了 test: 123 Header,以及 dubbo success 字符串作为 Body 体。这与我们在 DemoServiceImpl 编码的预期效果一致。
:::
- 查看 Dubbo Provider 的日志。
Key = content-length, Value = 17
Key = host, Value = example.org
Key = content-type, Value = application/x-www-form-urlencoded
Key = body, Value = [B@70754265
Key = accept, Value = */*
Key = user-agent, Value = curl/7.80.0
:::note 说明
通过 httpRequestContext 可以拿到 HTTP 请求的 Header 和 Body。其中 Header 会作为 Map 元素,而 Body 中 Key 值是固定的字符串"body",Value 则代表 Byte 数组。
:::
进阶篇:复杂场景示例
在上述的简单用例中可以看出,我们确实通过 Apache APISIX 将 Dubbo Service 发布为一个 HTTP 服务,但是在使用过程中的限制也非常明显。比如:接口的参数和返回值都必须要是 Map<String, Object>。
那么,如果项目中出现已经定义好、但又不符合上述限制的接口,该如何通过 Apache APISIX 来暴露 HTTP 服务呢?
操作步骤
针对上述场景,我们可以通过 HTTP Request Body 描述要调用的 Service 和 Method 以及对应参数,再利用 Java 的反射机制实现目标方法的调用。最后将返回值序列化为 JSON,并写入到 HTTP Response Body 中。
这样就可以将 Apache APISIX 的 「HTTP to Dubbo」 能力进一步加强,并应用到所有已存在的 Dubbo Service 中。具体操作可参考下方:
- 为已有项目增加一个 Dubbo Service 用来统一处理 HTTP to Dubbo 的转化。
public class DubboInvocationParameter {
    private String type;
    private String value;
}
public class DubboInvocation {
    private String service;
    private String method;
    private DubboInvocationParameter[] parameters;
}
public interface HTTP2DubboService {
    Map<String, Object> invoke(Map<String, Object> context)  throws Exception;
}
@Component
public class HTTP2DubboServiceImpl implements HTTP2DubboService {
    @Autowired
    private ApplicationContext appContext;
    @Override
    public Map<String, Object> invoke(Map<String, Object> context) throws Exception {
        DubboInvocation invocation = JSONObject.parseObject((byte[]) context.get("body"), DubboInvocation.class);
        Object[] args = new Object[invocation.getParameters().size()];
        for (int i = 0; i < args.length; i++) {
            DubboInvocationParameter parameter = invocation.getParameters().get(i);
            args[i] = JSONObject.parseObject(parameter.getValue(), Class.forName(parameter.getType()));
        }
        Object svc = appContext.getBean(Class.forName(invocation.getService()));
        Object result = svc.getClass().getMethod(invocation.getMethod()).invoke(args);
        Map<String, Object> httpResponse = new HashMap<>();
        httpResponse.put("status", 200);
        httpResponse.put("body", JSONObject.toJSONString(result));
        return httpResponse;
    }
}
- 通过如下命令请求来发起相关调用。
curl http://127.0.0.1:9080/demo  -H "Host: example.org"  -X POST --data '
{
    "service": "org.apache.dubbo.samples.apisix.DemoService",
    "method": "createUser",
    "parameters": [
        {
            "type": "org.apache.dubbo.samples.apisix.User",
            "value": "{'name': 'hello'}"
        }
    ]
}'
总结
本文为大家介绍了如何借助 Apache APISIX 实现 Dubbo Service 的代理,通过引入 dubbo-proxy 插件便可为 Dubbo 框架的后端系统构建更简单更高效的流量链路。
希望通过上述操作步骤和用例场景分享,能为大家在相关场景的使用提供借鉴思路。更多关于 dubbo-proxy 插件的介绍与使用可参考官方文档。