3 - Dubbo x Spring Boot to develop microservice applications
Target
Start from scratch to develop microservices based on Dubbo x Spring Boot, and understand the configuration method of Dubbo x Spring Boot.
Difficulty
Low
Environmental requirements
System: Windows, Linux, MacOS
JDK 8 and above (JDK17 is recommended)
Git
IntelliJ IDEA (optional)
Docker (optional)
Project Introduction
In this task, it will be divided into three sub-modules for independent development, simulating the deployment architecture in the production environment.
.//apache/dubbo-samples/1-basic/dubbo-samples-spring-boot
├── dubbo-samples-spring-boot-interface // shared API module
├── dubbo-samples-spring-boot-consumer // consumer module
└── dubbo-samples-spring-boot-provider // server module
As shown above, there are 3 modules in total, among which the interface module is jointly dependent by the consumer and provider modules, and stores the API interface used by RPC communication.
.//apache/dubbo-samples/1-basic/dubbo-samples-spring-boot
├── dubbo-samples-spring-boot-interface // shared API module
│ ├── pom.xml
│ └── src
│ └── main
│ └── java
│ └── org
│ └── apache
│ └── dubbo
│ └── springboot
│ └── demo
│ └── DemoService.java // API interface
├── dubbo-samples-spring-boot-consumer // consumer module
│ ├── pom.xml
│ └── src
│ ├── main
│ │ ├── java
│ │ │ └── org
│ │ │ └── apache
│ │ │ └── dubbo
│ │ │ └── springboot
│ │ │ └── demo
│ │ │ └── consumer
│ │ │ ├── ConsumerApplication.java // consumer startup class
│ │ │ └── Task.java // The consumer simulates calling tasks
│ │ └── resources
│ │ └── application.yml // Spring Boot configuration file
├── dubbo-samples-spring-boot-provider // server module
│ ├── pom.xml
│ └── src
│ └── main
│ ├── java
│ │ └── org
│ │ └── apache
│ │ └── dubbo
│ │ └── springboot
│ │ └── demo
│ │ └── provider
│ │ ├── DemoServiceImpl.java // server implementation class
│ │ └── ProviderApplication.java // server startup class
│ └── resources
│ └── application.yml // Spring Boot configuration file
└── pom.xml
The above is the file structure of the project that will be used in this tutorial.
Rapid deployment (directly started based on Samples)
This chapter will teach you step by step how to deploy and run a Dubbo x Spring Boot-based use case through a few simple commands.
Note: The details of the code deployed in this chapter can be found in 1-basic/dubbo-samples-spring-boot in the repository of apache/dubbo-samples, It will also be explained in the next chapter.
1. Get the test project
Before starting the whole tutorial, we need to get the code of the test project. All test case codes of Dubbo are stored in the repository apache/dubbo-samples, the following command can help you get all the codes in the Samples repository.
git clone --depth=1 --branch master git@github.com:apache/dubbo-samples.git
2. Start a simple registration center
For a microservice application, the registry is an indispensable component. Only through the registration center, the consumer can successfully discover the address information of the server, and then make a call.
To make this tutorial easier to use, we provide a simple starter based on the Apache Zookeeper registry. If you need to deploy the registry in a production environment, please refer to Production Environment Initialization to deploy a highly available registry.
Windows:
./mvnw.cmd clean compile exec:java -pl tools/embedded-zookeeper

Linux / MacOS:
./mvnw clean compile exec:java -pl tools/embedded-zookeeper

Docker:
docker run --name some-zookeeper -p 2181:2181 --restart always -d zookeeper
3. Local packaging API module
In order to successfully compile the server and consumer modules, you need to package and install the dubbo-samples-spring-boot-interface module locally first.
./mvnw clean install -pl 1-basic/dubbo-samples-spring-boot
./mvnw clean install -pl 1-basic/dubbo-samples-spring-boot/dubbo-samples-spring-boot-interface
4. Start the service provider
After starting the registry, the next step is to start a service provider that provides services externally. Corresponding samples are also provided in dubbo-samples, which can be quickly pulled up by the following command.
Windows:
./mvnw.cmd clean compile exec:java -pl 1-basic/dubbo-samples-spring-boot/dubbo-samples-spring-boot-provider "-Dexec.mainClass=org.apache.dubbo.springboot.demo.provider.ProviderApplication"

Linux / MacOS:
./mvnw clean compile exec:java -pl 1-basic/dubbo-samples-spring-boot/dubbo-samples-spring-boot-provider -Dexec.mainClass="org.apache.dubbo.springboot.demo.provider.ProviderApplication"

Note: You need to open an independent terminal to run, and the command will keep executing.
After executing the above command, wait for a while for the following log to appear (Current Spring Boot Application is await), which means that the service provider has started, indicating that the service provider can provide services externally.
2023-02-08 17:13:00.357 INFO 80600 --- [lication.main()] o.a.d.c.d.DefaultApplicationDeployer : [DUBBO] Dubbo Application[1.1](dubbo-springboot-demo-provider) is ready., dubbo version: 3.2 .0-beta.4, current host: 30.221.128.96
2023-02-08 17:13:00.369 INFO 80600 --- [lication.main()] o.a.d.s.d.provider.ProviderApplication : Started ProviderApplication in 9.114 seconds (JVM running for 26.522)
2023-02-08 17:13:00.387 INFO 80600 --- [pool-1-thread-1].b.c.e.AwaitingNonWebApplicationListener : [Dubbo] Current Spring Boot Application is await...
5. Start service consumer
The last step is to start a service consumer to call the service provider, which is the core of the RPC call, providing a bridge for the service consumer to call the service provider.
Windows:
./mvnw.cmd clean compile exec:java -pl 1-basic/dubbo-samples-spring-boot/dubbo-samples-spring-boot-consumer "-Dexec.mainClass=org.apache.dubbo.springboot.demo.consumer.ConsumerApplication"

Linux / MacOS:
./mvnw clean compile exec:java -pl 1-basic/dubbo-samples-spring-boot/dubbo-samples-spring-boot-consumer -Dexec.mainClass="org.apache.dubbo.springboot.demo.consumer.ConsumerApplication"
After executing the above command, wait for a while for the following log (Hello world) to appear. The printed data is returned after the service provider processes it, marking the success of a service call.
2023-02-08 17:14:33.045 INFO 80740 --- [lication.main()] o.a.d.s.d.consumer.ConsumerApplication : Started ConsumerApplication in 11.052 seconds (JVM running for 31.62)
Receive result ======> Hello world
2023-02-08 17:14:33.146 INFO 80740 --- [pool-1-thread-1].b.c.e.AwaitingNonWebApplicationListener : [Dubbo] Current Spring Boot Application is await...
Wed Feb 08 17:14:34 CST 2023 Receive result ======> Hello world
Wed Feb 08 17:14:35 CST 2023 Receive result ======> Hello world
Wed Feb 08 17:14:36 CST 2023 Receive result ======> Hello world
Wed Feb 08 17:14:37 CST 2023 Receive result ======> Hello world
Hands-on practice (from zero code development version)
This chapter will teach you how to develop a microservice application from scratch through step-by-step tutorials.
1. Start the registration center
For a microservice application, the registry is an indispensable component. Only through the registration center, the consumer can successfully discover the address information of the server, and then make a call.
To make this tutorial easier to use, we provide a simple starter based on the Apache Zookeeper registry. If you need to deploy the registry in a production environment, please refer to Production Environment Initialization to deploy a highly available registry.
Windows:
git clone --depth=1 --branch master git@github.com:apache/dubbo-samples.git
cd dubbo-samples
./mvnw.cmd clean compile exec:java -pl tools/embedded-zookeeper

Linux / MacOS:
git clone --depth=1 --branch master git@github.com:apache/dubbo-samples.git
cd dubbo-samples
./mvnw clean compile exec:java -pl tools/embedded-zookeeper

Docker:
docker run --name some-zookeeper -p 2181:2181 --restart always -d zookeeper
2. Initialize the project
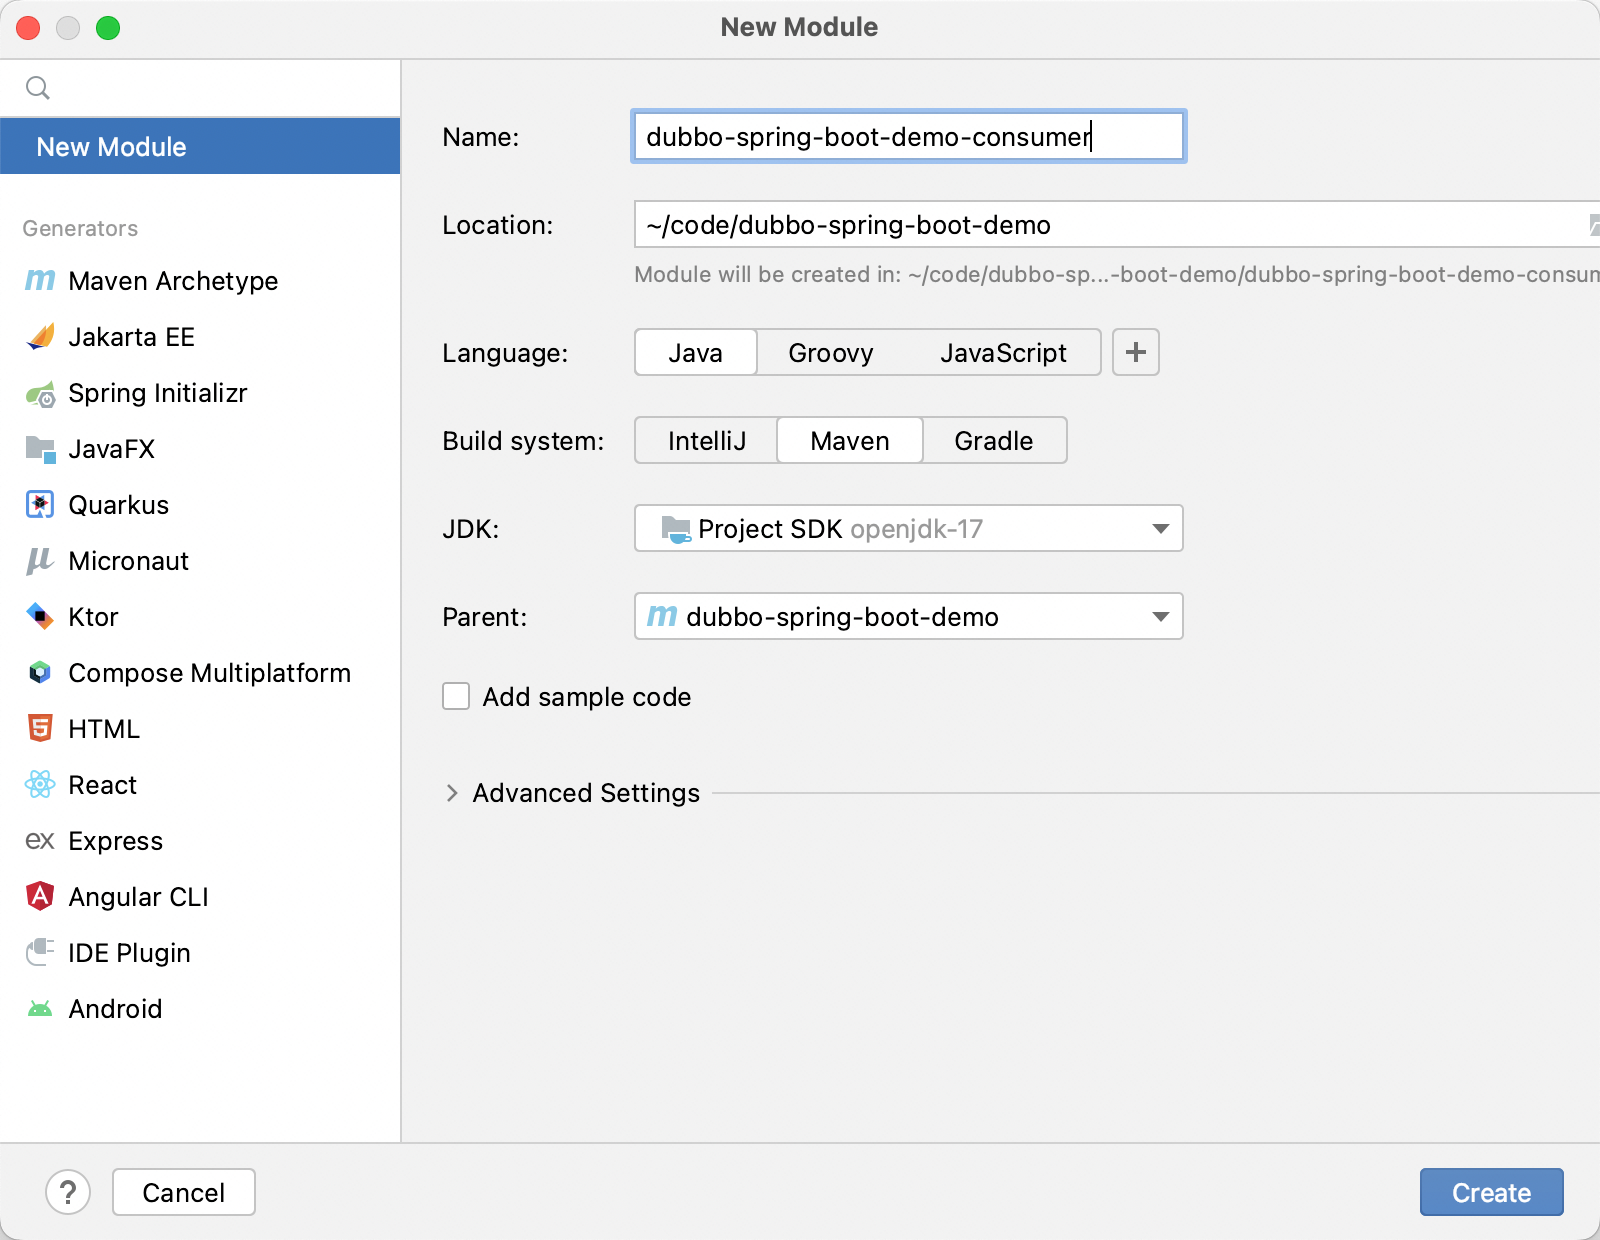
Starting from this section, the project will be built and tested based on IntelliJ IDEA.
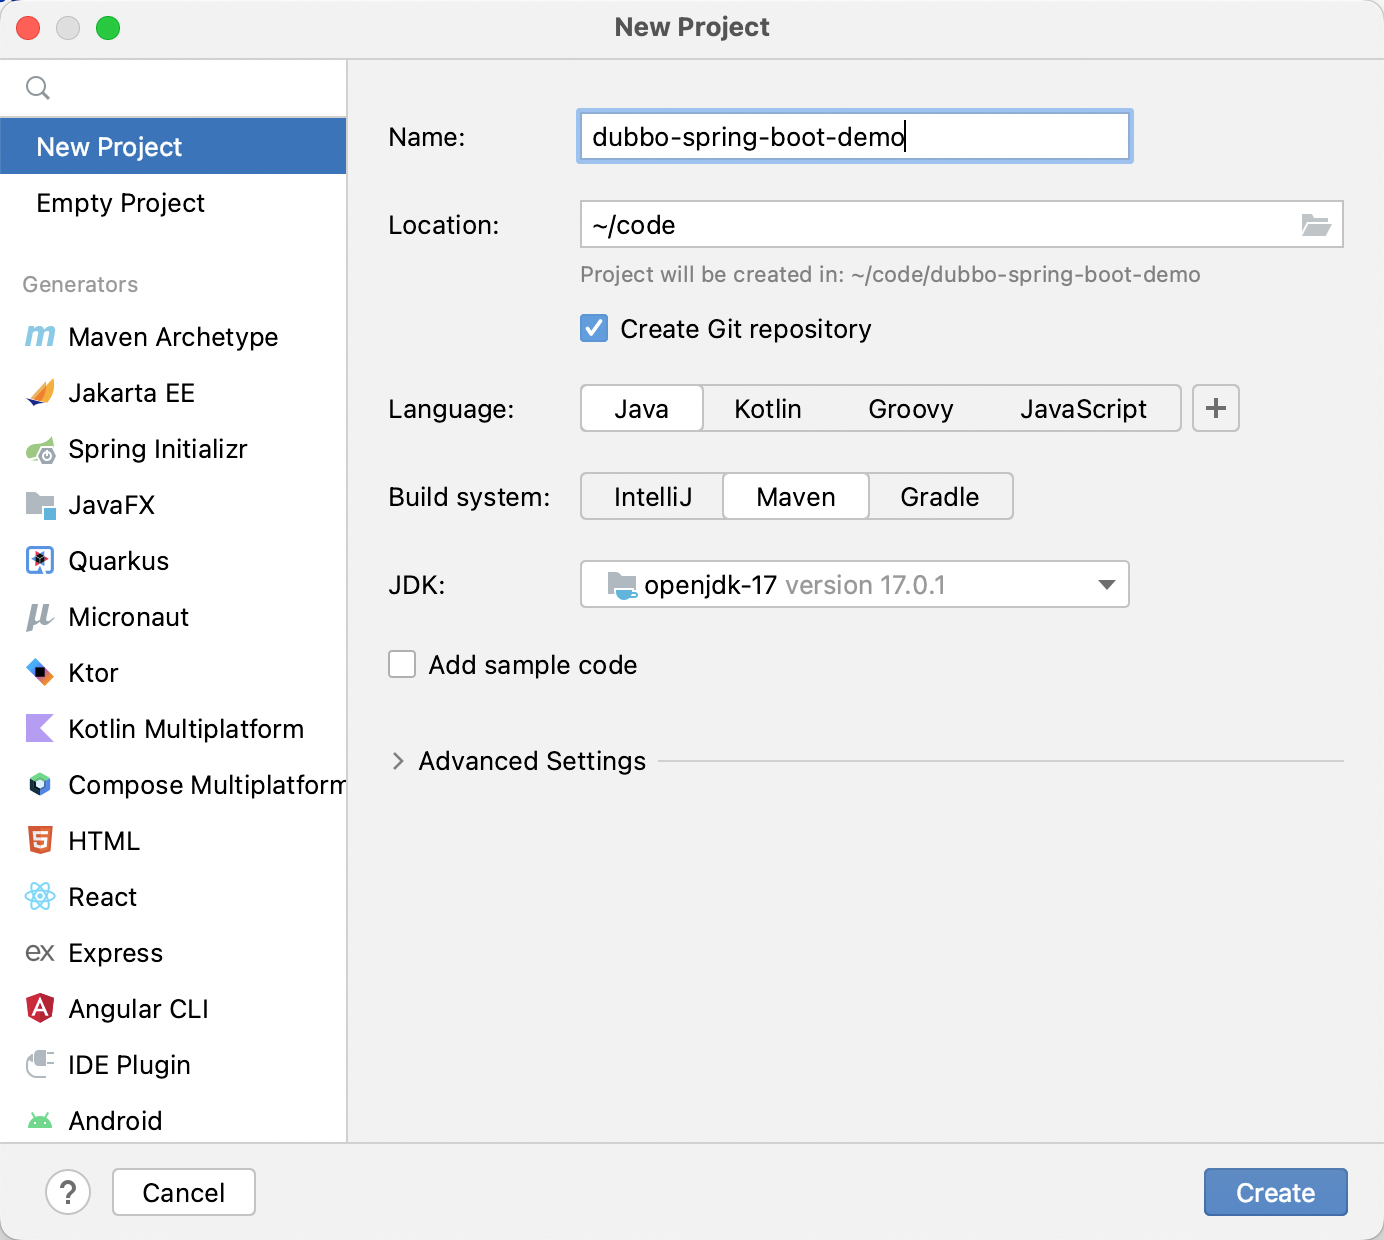
As shown above, a basic project can be built.
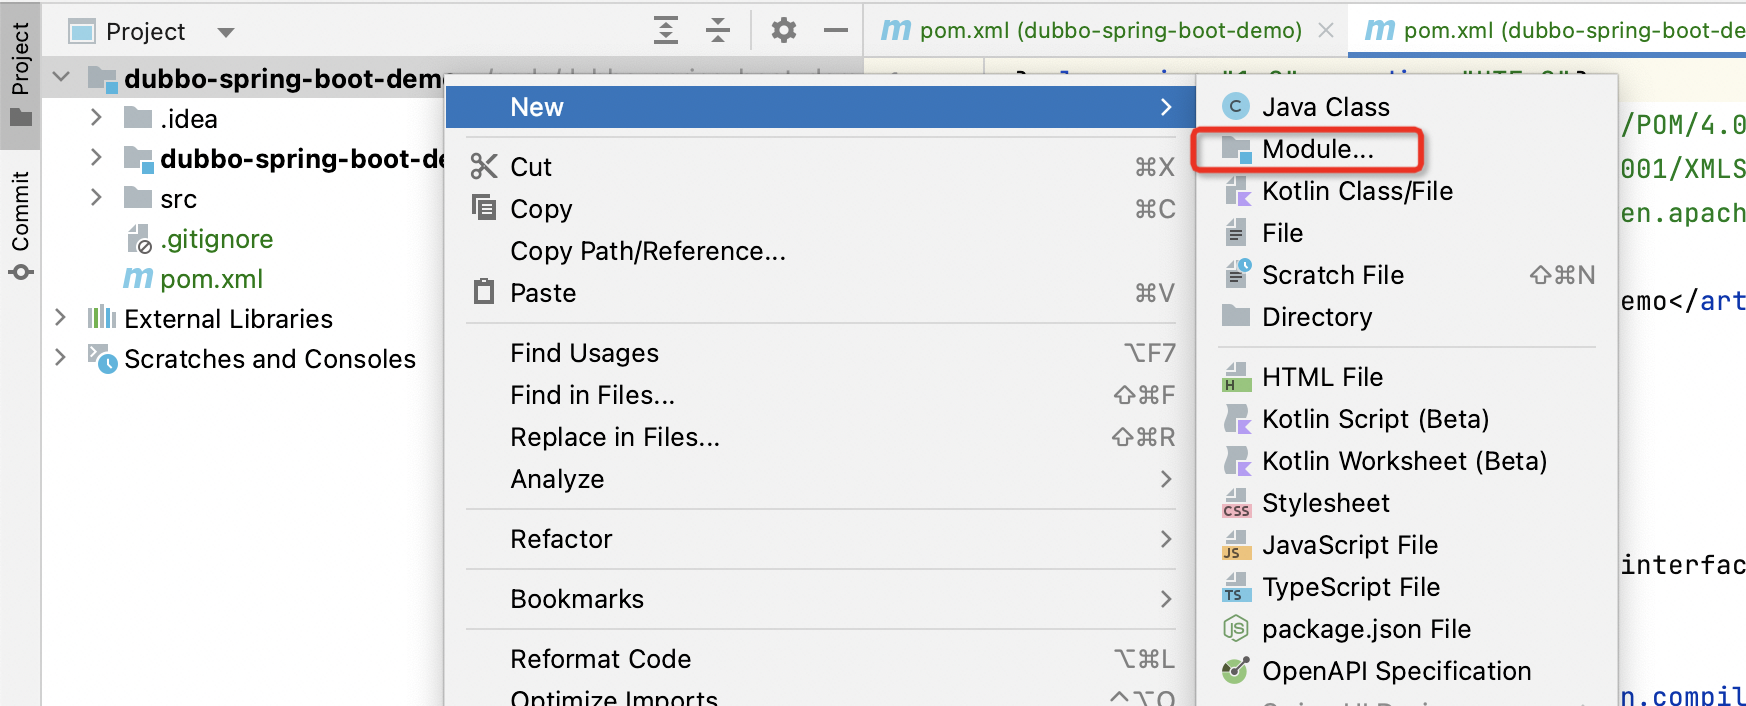
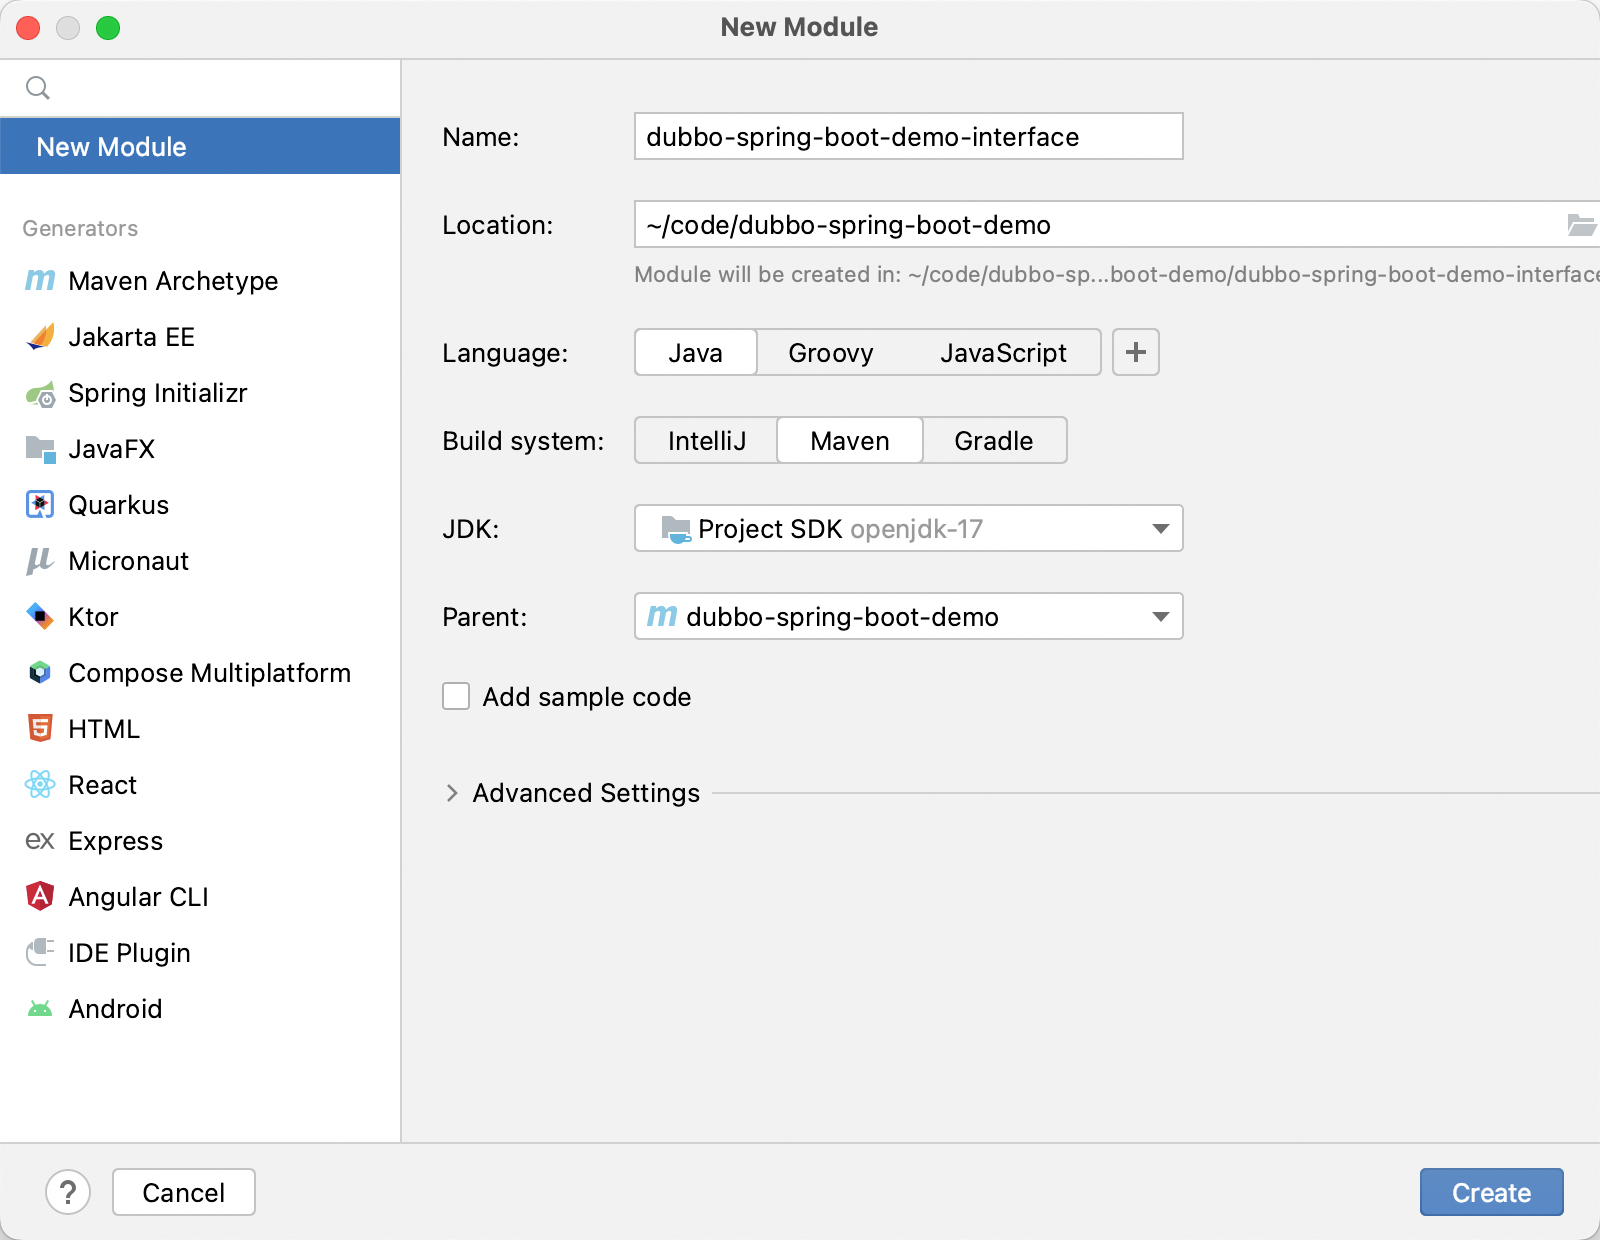
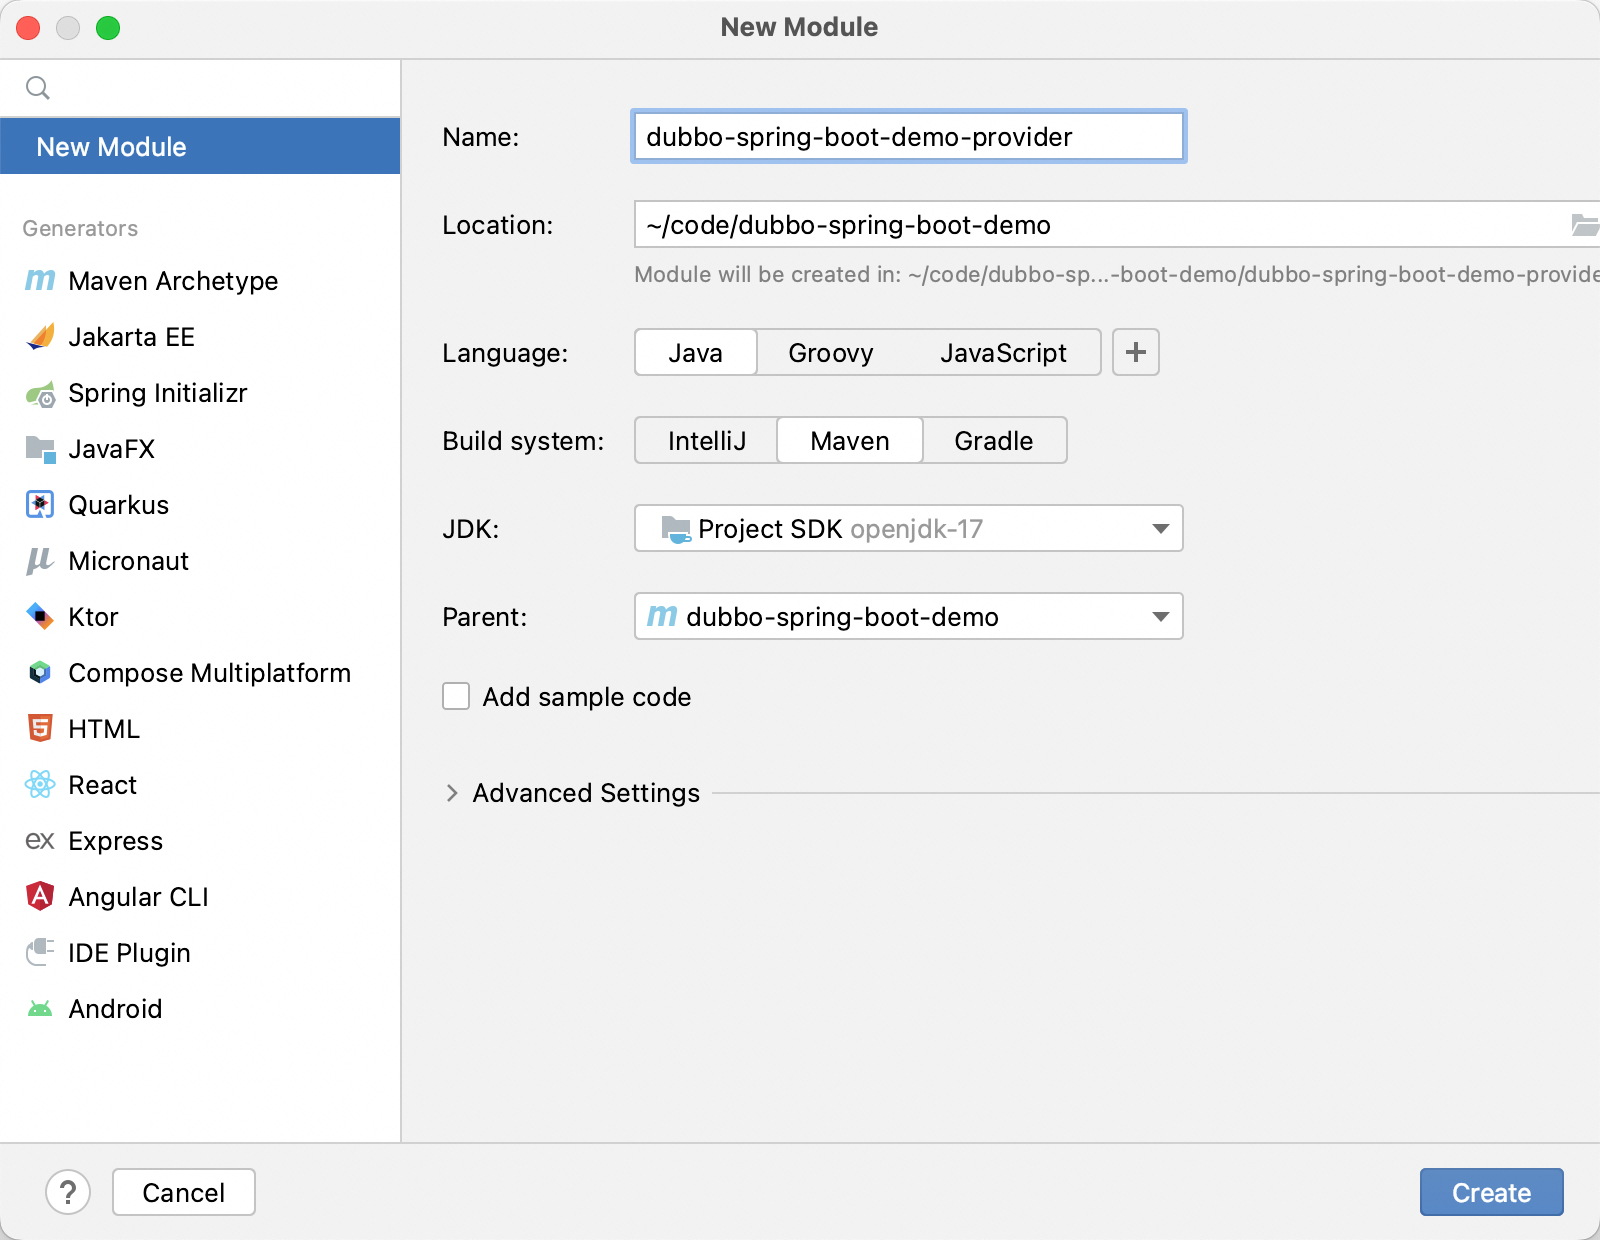
After building the basic project, we need to create three submodules dubbo-spring-boot-demo-interface, dubbo-spring-boot-demo-provider and dubbo-spring-boot-demo-consumer.
After creating the three submodules, you need to create the following folders:
Create
org.apache.dubbo.springboot.demo.consumerpackage underdubbo-spring-boot-demo-consumer/src/main/javaCreate
org.apache.dubbo.springboot.demopackage underdubbo-spring-boot-demo-interface/src/main/javaCreate
org.apache.dubbo.springboot.demo.providerpackage underdubbo-spring-boot-demo-provider/src/main/java
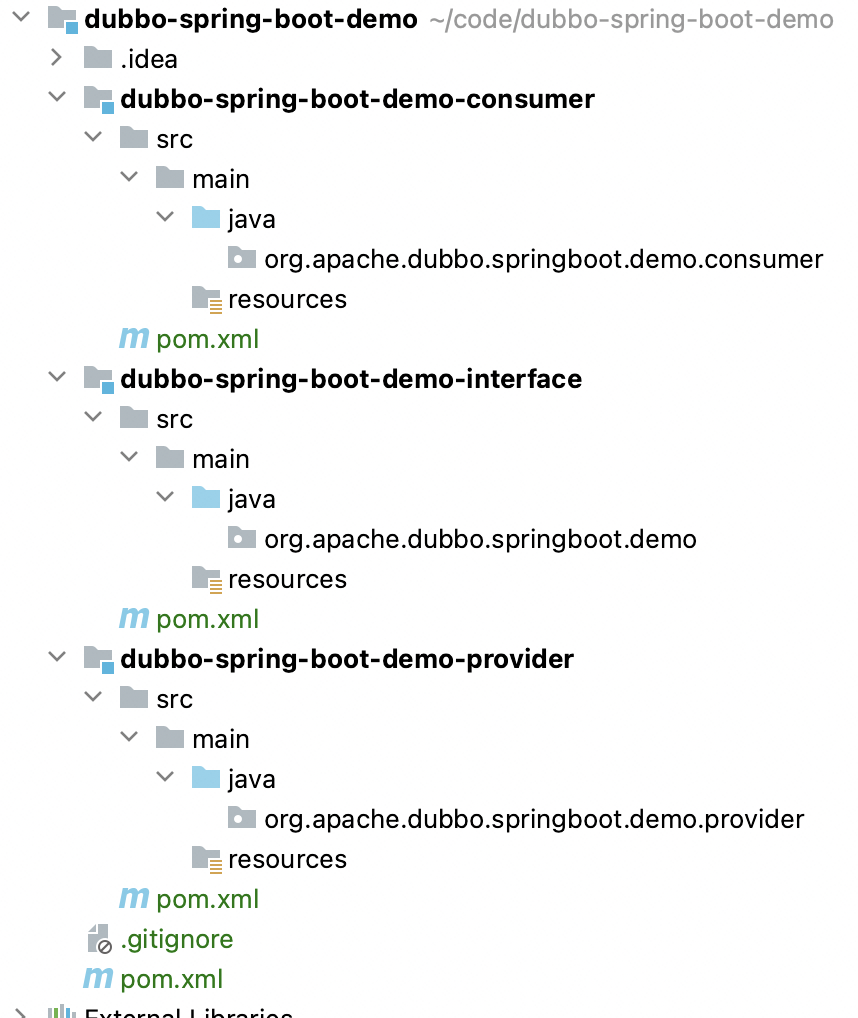
The final folder reference is shown in the image above.
3. Add Maven dependencies
After initializing the project, we need to add Dubbo-related maven dependencies first.
For multi-module projects, you first need to configure dependency information in pom.xml of the parent project.

Edit the ./pom.xml file and add the following configuration.
    <properties>
        <dubbo.version>3.2.0-beta.4</dubbo.version>
        <spring-boot.version>2.7.8</spring-boot.version>
        <maven.compiler.source>17</maven.compiler.source>
        <maven.compiler.target>17</maven.compiler.target>
        <project.build.sourceEncoding>UTF-8</project.build.sourceEncoding>
    </properties>

    <dependencyManagement>
        <dependencies>
            <!-- Spring Boot -->
            <dependency>
                <groupId>org.springframework.boot</groupId>
                <artifactId>spring-boot-dependencies</artifactId>
                <version>${spring-boot.version}</version>
                <type>pom</type>
                <scope>import</scope>
            </dependency>

            <!-- Dubbo -->
            <dependency>
                <groupId>org.apache.dubbo</groupId>
                <artifactId>dubbo-bom</artifactId>
                <version>${dubbo.version}</version>
                <type>pom</type>
                <scope>import</scope>
            </dependency>

            <dependency>
                <groupId>org.apache.dubbo</groupId>
                <artifactId>dubbo-dependencies-zookeeper-curator5</artifactId>
                <version>${dubbo.version}</version>
                <type>pom</type>
            </dependency>
        </dependencies>
    </dependencyManagement>


    <build>
        <plugin Management>
            <plugins>
                <plugin>
                    <groupId>org.springframework.boot</groupId>
                    <artifactId>spring-boot-maven-plugin</artifactId>
                    <version>${spring-boot.version}</version>
                </plugin>
            </plugins>
        </pluginManagement>
    </build>
Then configure specific dependencies in the two modules pom.xml of dubbo-spring-boot-consumer and dubbo-spring-boot-provider.
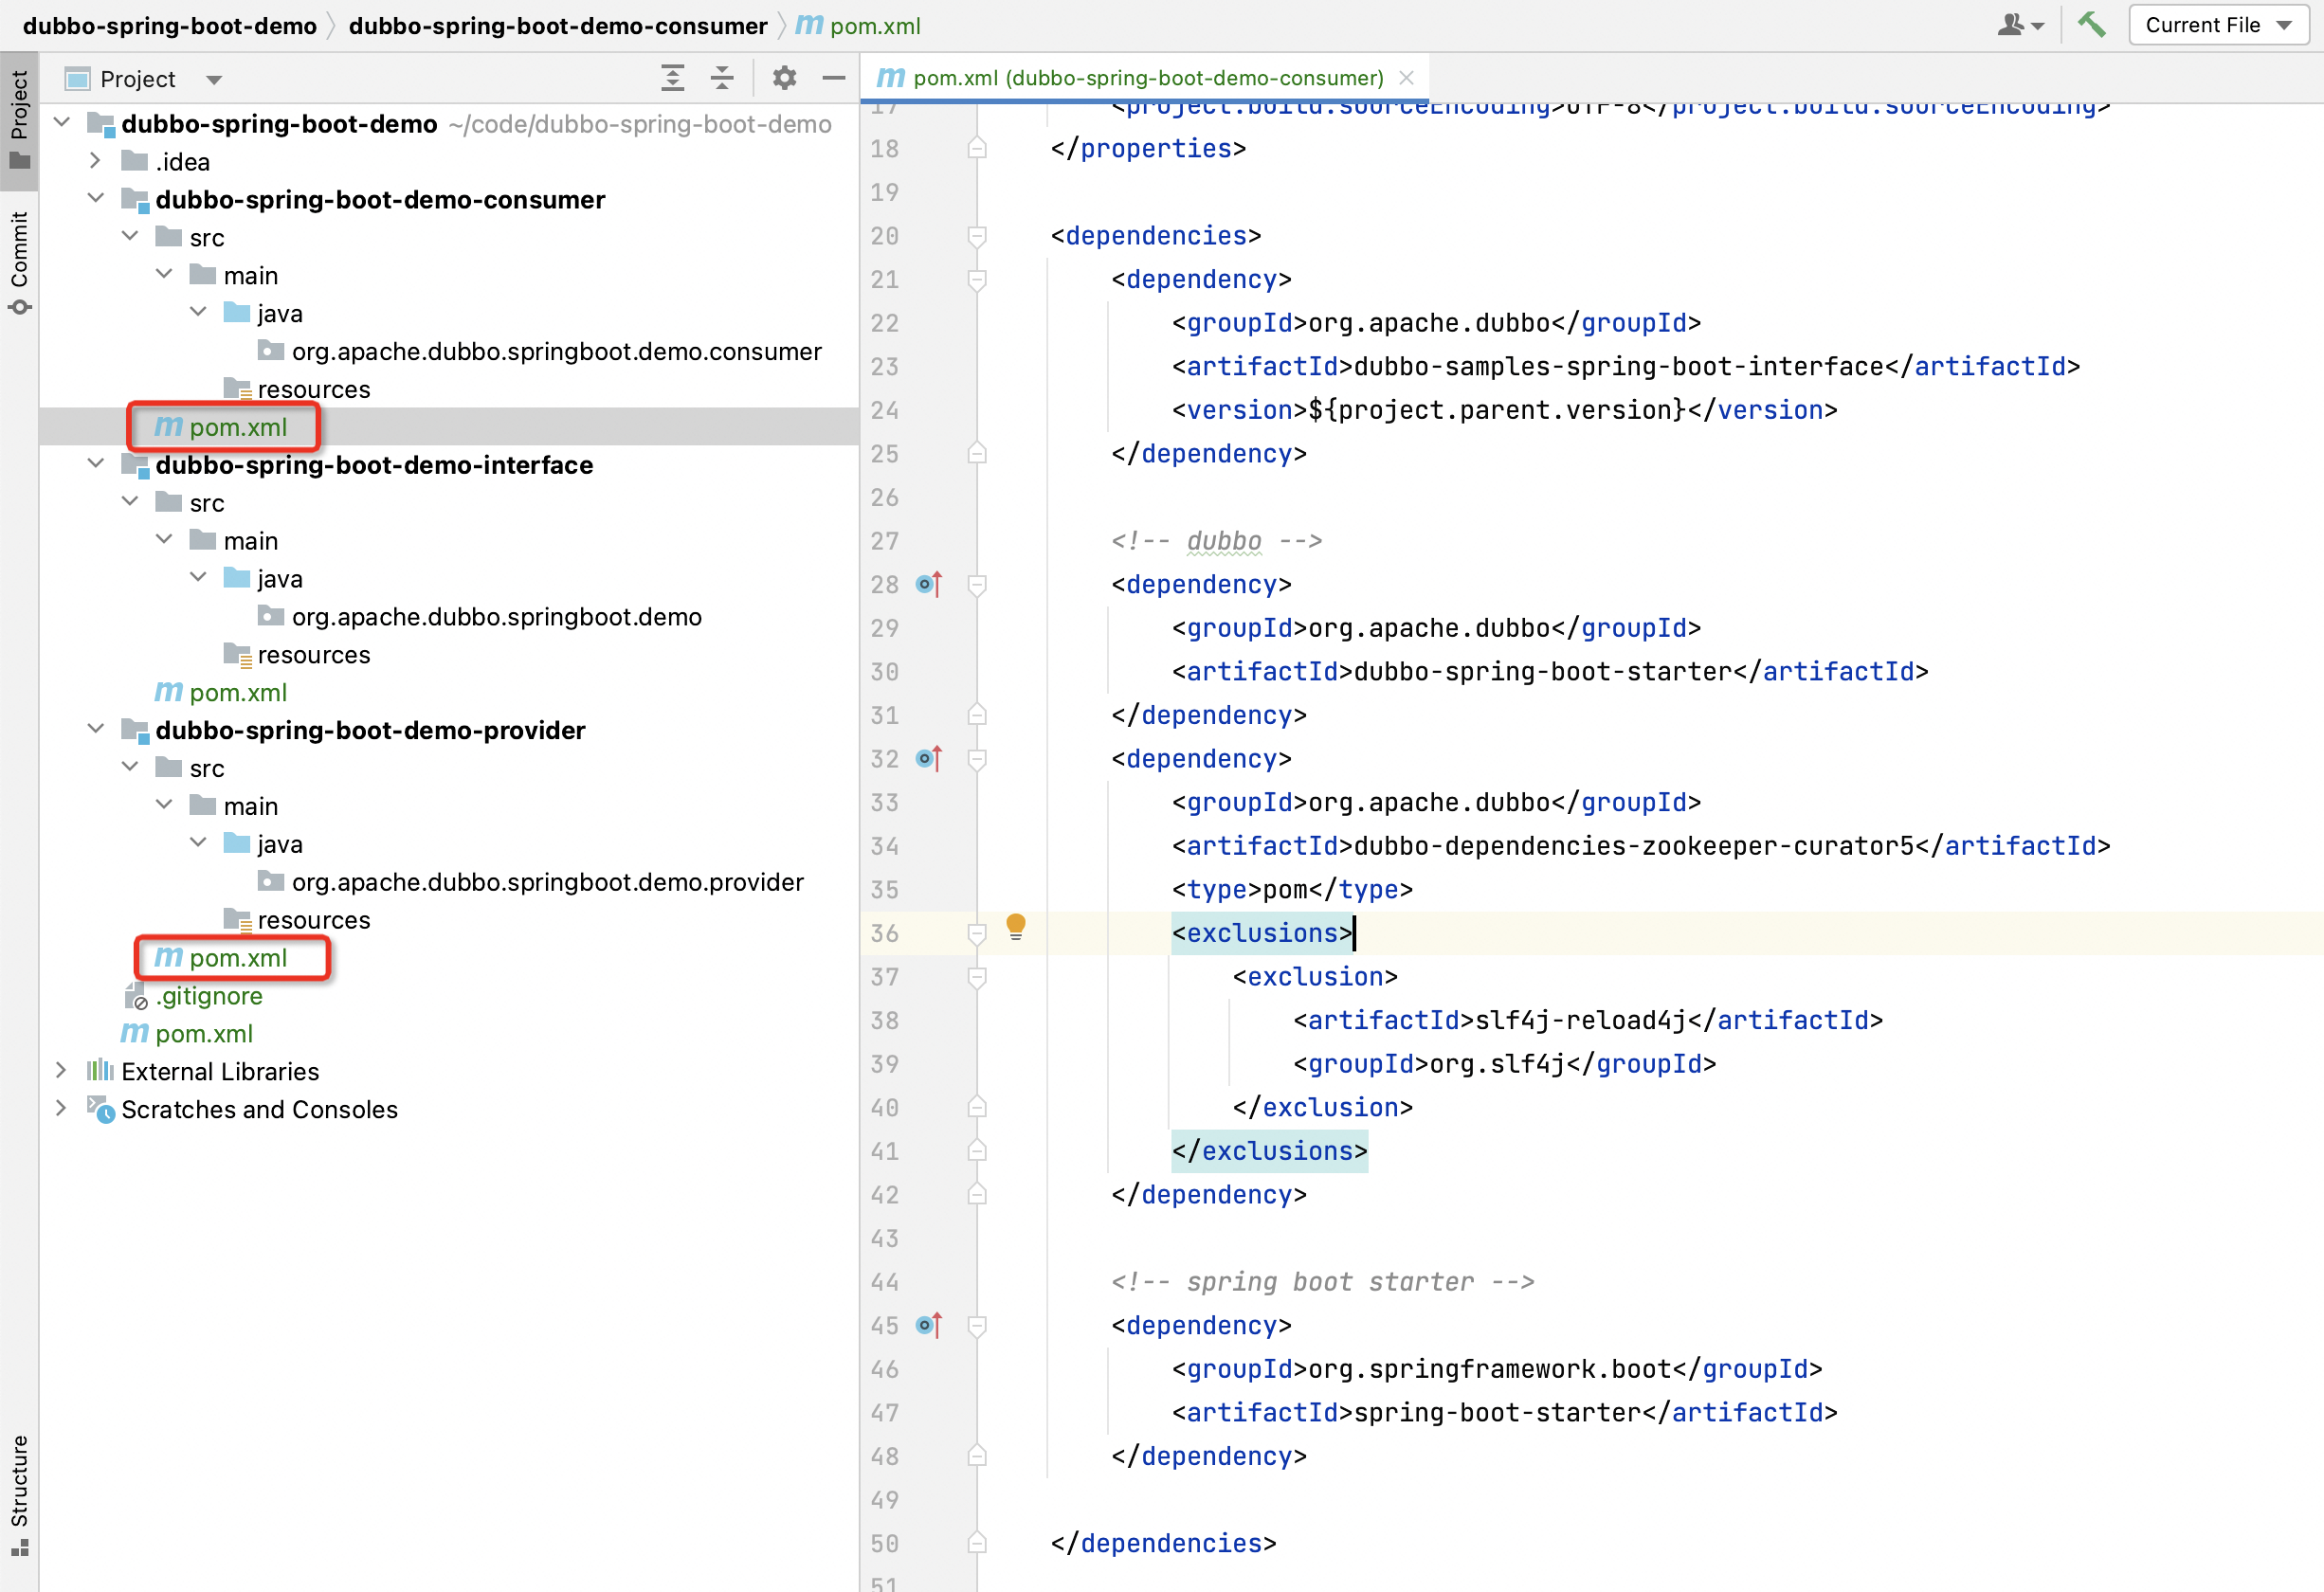
Edit ./dubbo-spring-boot-consumer/pom.xml and ./dubbo-spring-boot-provider/pom.xml and add the following configurations.
    <dependencies>
        <dependency>
            <groupId>org.apache.dubbo</groupId>
            <artifactId>dubbo-samples-spring-boot-interface</artifactId>
            <version>${project.parent.version}</version>
        </dependency>

        <!-- dubbo -->
        <dependency>
            <groupId>org.apache.dubbo</groupId>
            <artifactId>dubbo-spring-boot-starter</artifactId>
        </dependency>
        <dependency>
            <groupId>org.apache.dubbo</groupId>
            <artifactId>dubbo-dependencies-zookeeper-curator5</artifactId>
            <type>pom</type>
            <exclusions>
                <exclusion>
                    <artifactId>slf4j-reload4j</artifactId>
                    <groupId>org.slf4j</groupId>
                </exclusion>
            </exclusions>
        </dependency>

        <!-- spring boot starter -->
        <dependency>
            <groupId>org.springframework.boot</groupId>
            <artifactId>spring-boot-starter</artifactId>
        </dependency>

    </dependencies>
In this configuration, the dependencies of dubbo and zookeeper (and the corresponding connector curator) are defined.
After adding the above configuration, you can refresh dependencies through IDEA’s Maven - Reload All Maven Projects.
4. Define service interface
The service interface is a bridge between the consumer and the server in Dubbo.

Create DemoService interface under org.apache.dubbo.samples.api of dubbo-spring-boot-demo-interface module, defined as follows:
package org.apache.dubbo.springboot.demo;

public interface DemoService {

    String sayHello(String name);
}
In DemoService, the sayHello method is defined. Subsequent services published by the server and services subscribed by the consumer are all developed around the DemoService interface.
5. Define the implementation of the server
After defining the service interface, you can define the corresponding implementation on the server side. Compared with the consumer side, this part of the implementation is a remote implementation, and there is no relevant information locally.
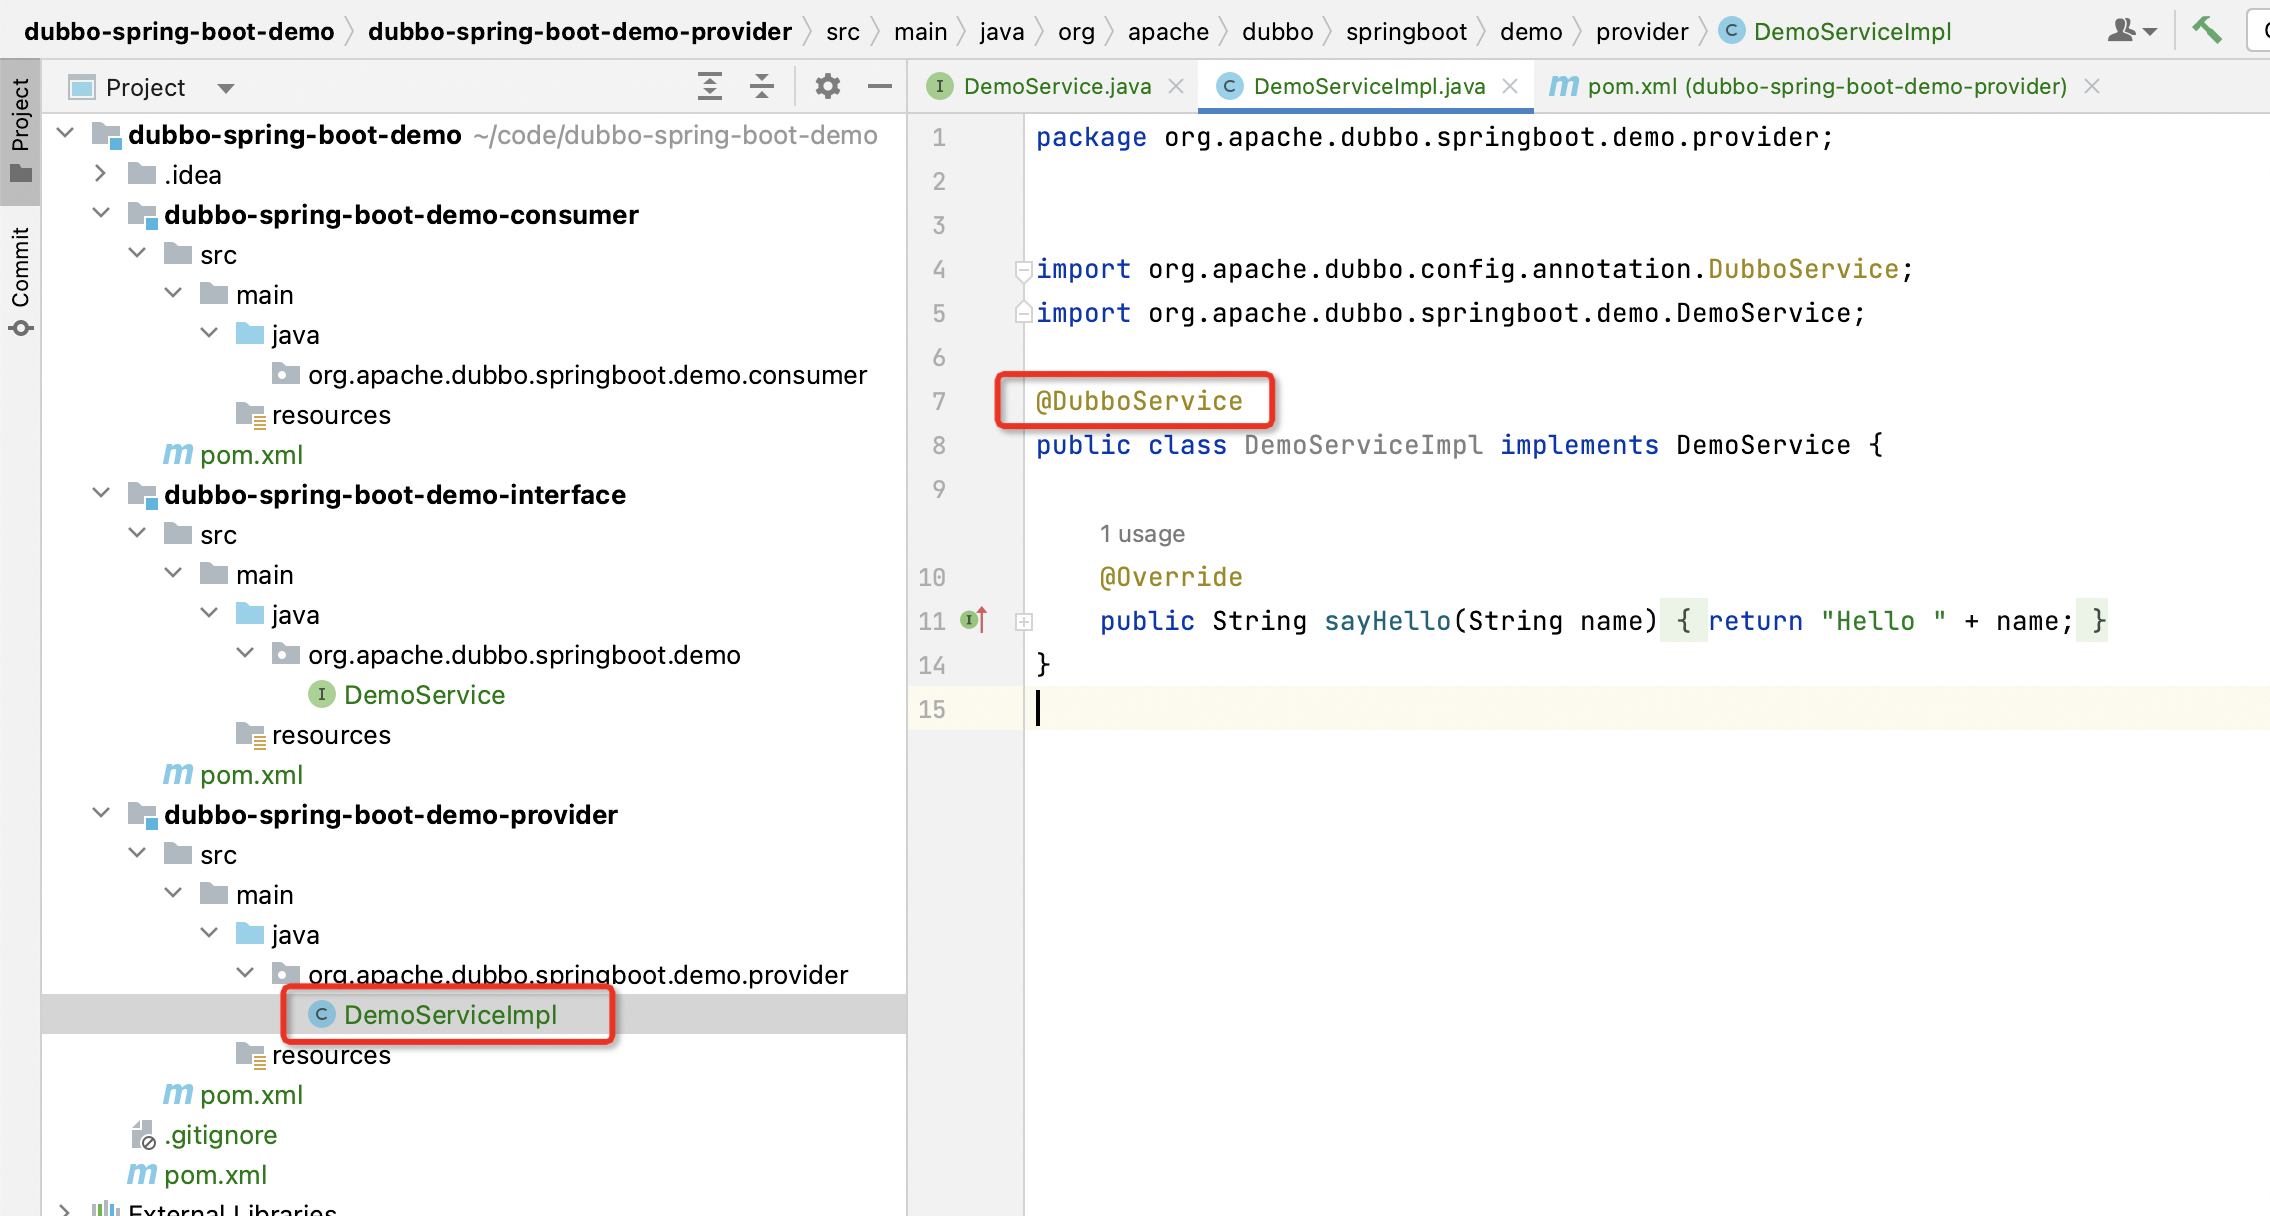
Create DemoServiceImpl class under org.apache.dubbo.samples.provider of dubbo-spring-boot-demo-provider module, defined as follows:
package org.apache.dubbo.springboot.demo.provider;

import org.apache.dubbo.config.annotation.DubboService;
import org.apache.dubbo.springboot.demo.DemoService;

@DubboService
public class DemoServiceImpl implements DemoService {

    @Override
    public String sayHello(String name) {
        return "Hello " + name;
    }
}
In DemoServiceImpl, implement DemoService interface, return Hello name for sayHello method.
Note: The @DubboService annotation is added to the DemoServiceImpl class. Through this configuration, the Dubbo service can be published based on Spring Boot.
6. Configure the server-side Yaml configuration file
From this step to step 7, some basic information of Dubbo will be configured through Spring Boot.
First, let’s create a configuration file for the server.
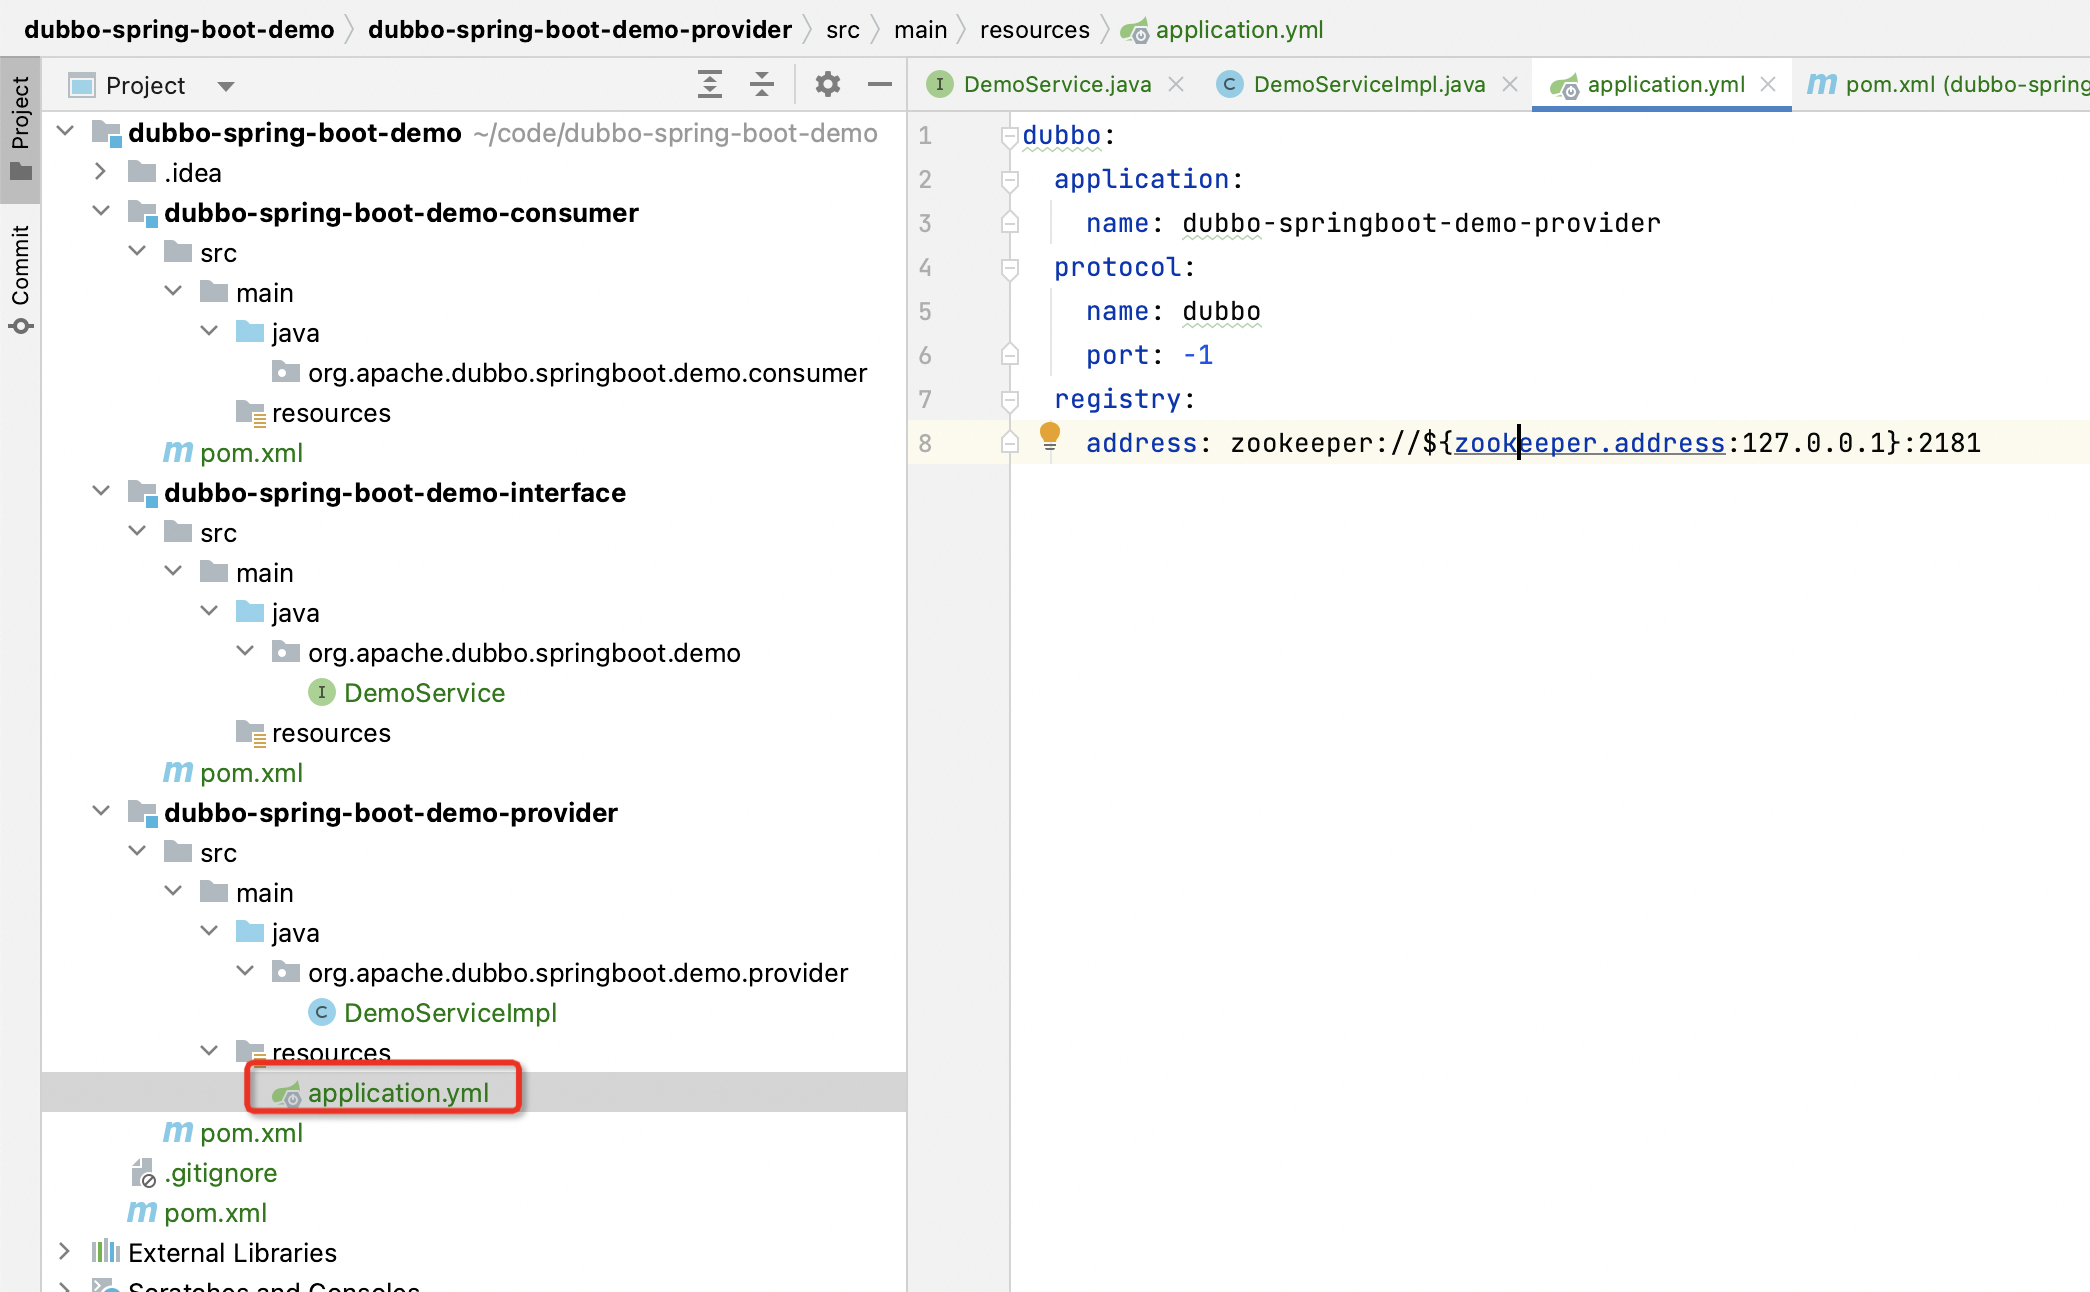
Create application.yml file under resources resource folder of dubbo-spring-boot-demo-provider module, defined as follows:
dubbo:
  application:
    name: dubbo-springboot-demo-provider
  protocol:
    name: dubbo
    port: -1
  registry:
    address: zookeeper://${zookeeper.address:127.0.0.1}:2181
In this configuration file, the Dubbo application name, Dubbo protocol information, and the registration center address used by Dubbo are defined.
7. Configure the consumer Yaml configuration file
Similarly, we need to create a configuration file for the consumer.
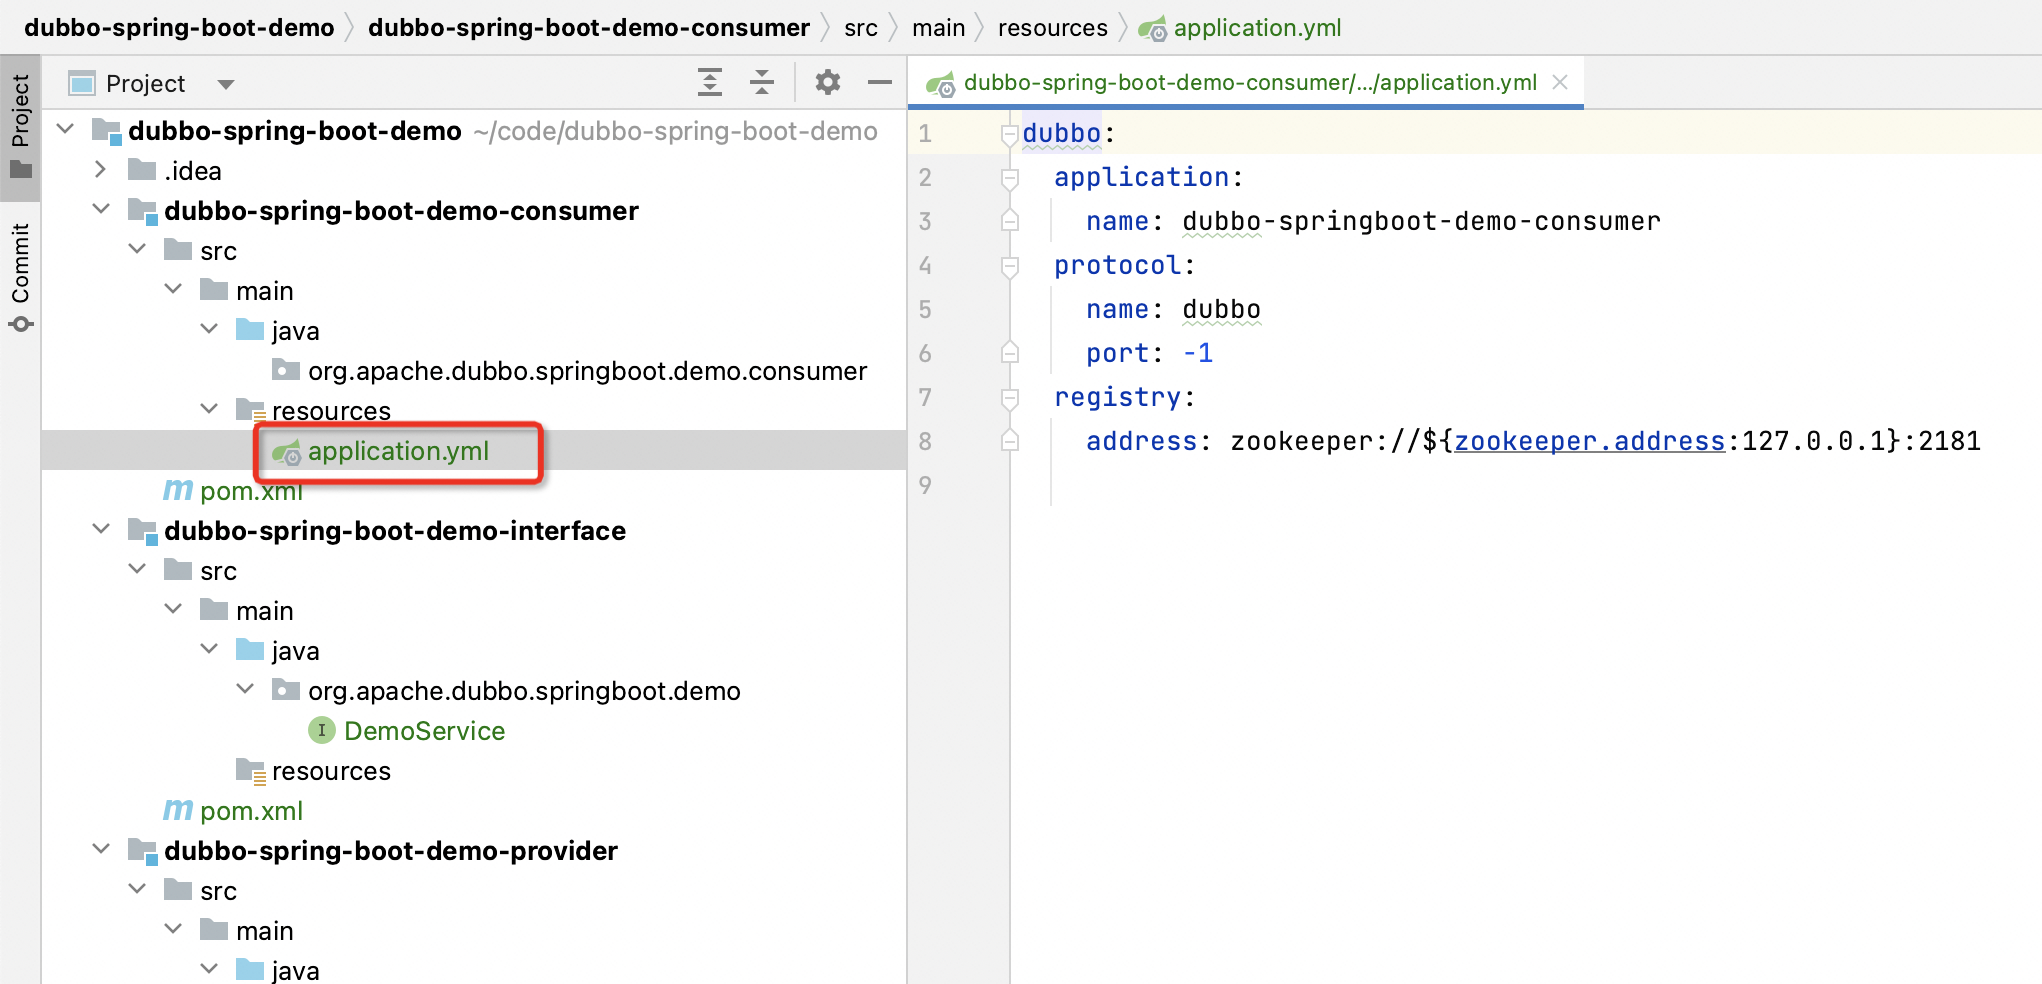
Create application.yml file under resources resource folder of dubbo-spring-boot-demo-consumer module, defined as follows:
dubbo:
  application:
    name: dubbo-springboot-demo-consumer
  protocol:
    name: dubbo
    port: -1
  registry:
    address: zookeeper://${zookeeper.address:127.0.0.1}:2181
In this configuration file, the Dubbo application name, Dubbo protocol information, and the registration center address used by Dubbo are defined.
8. Configure the server startup class based on Spring
In addition to configuring the Yaml configuration file, we also need to create a Spring Boot-based startup class.
First of all, we first create the startup class of the server.
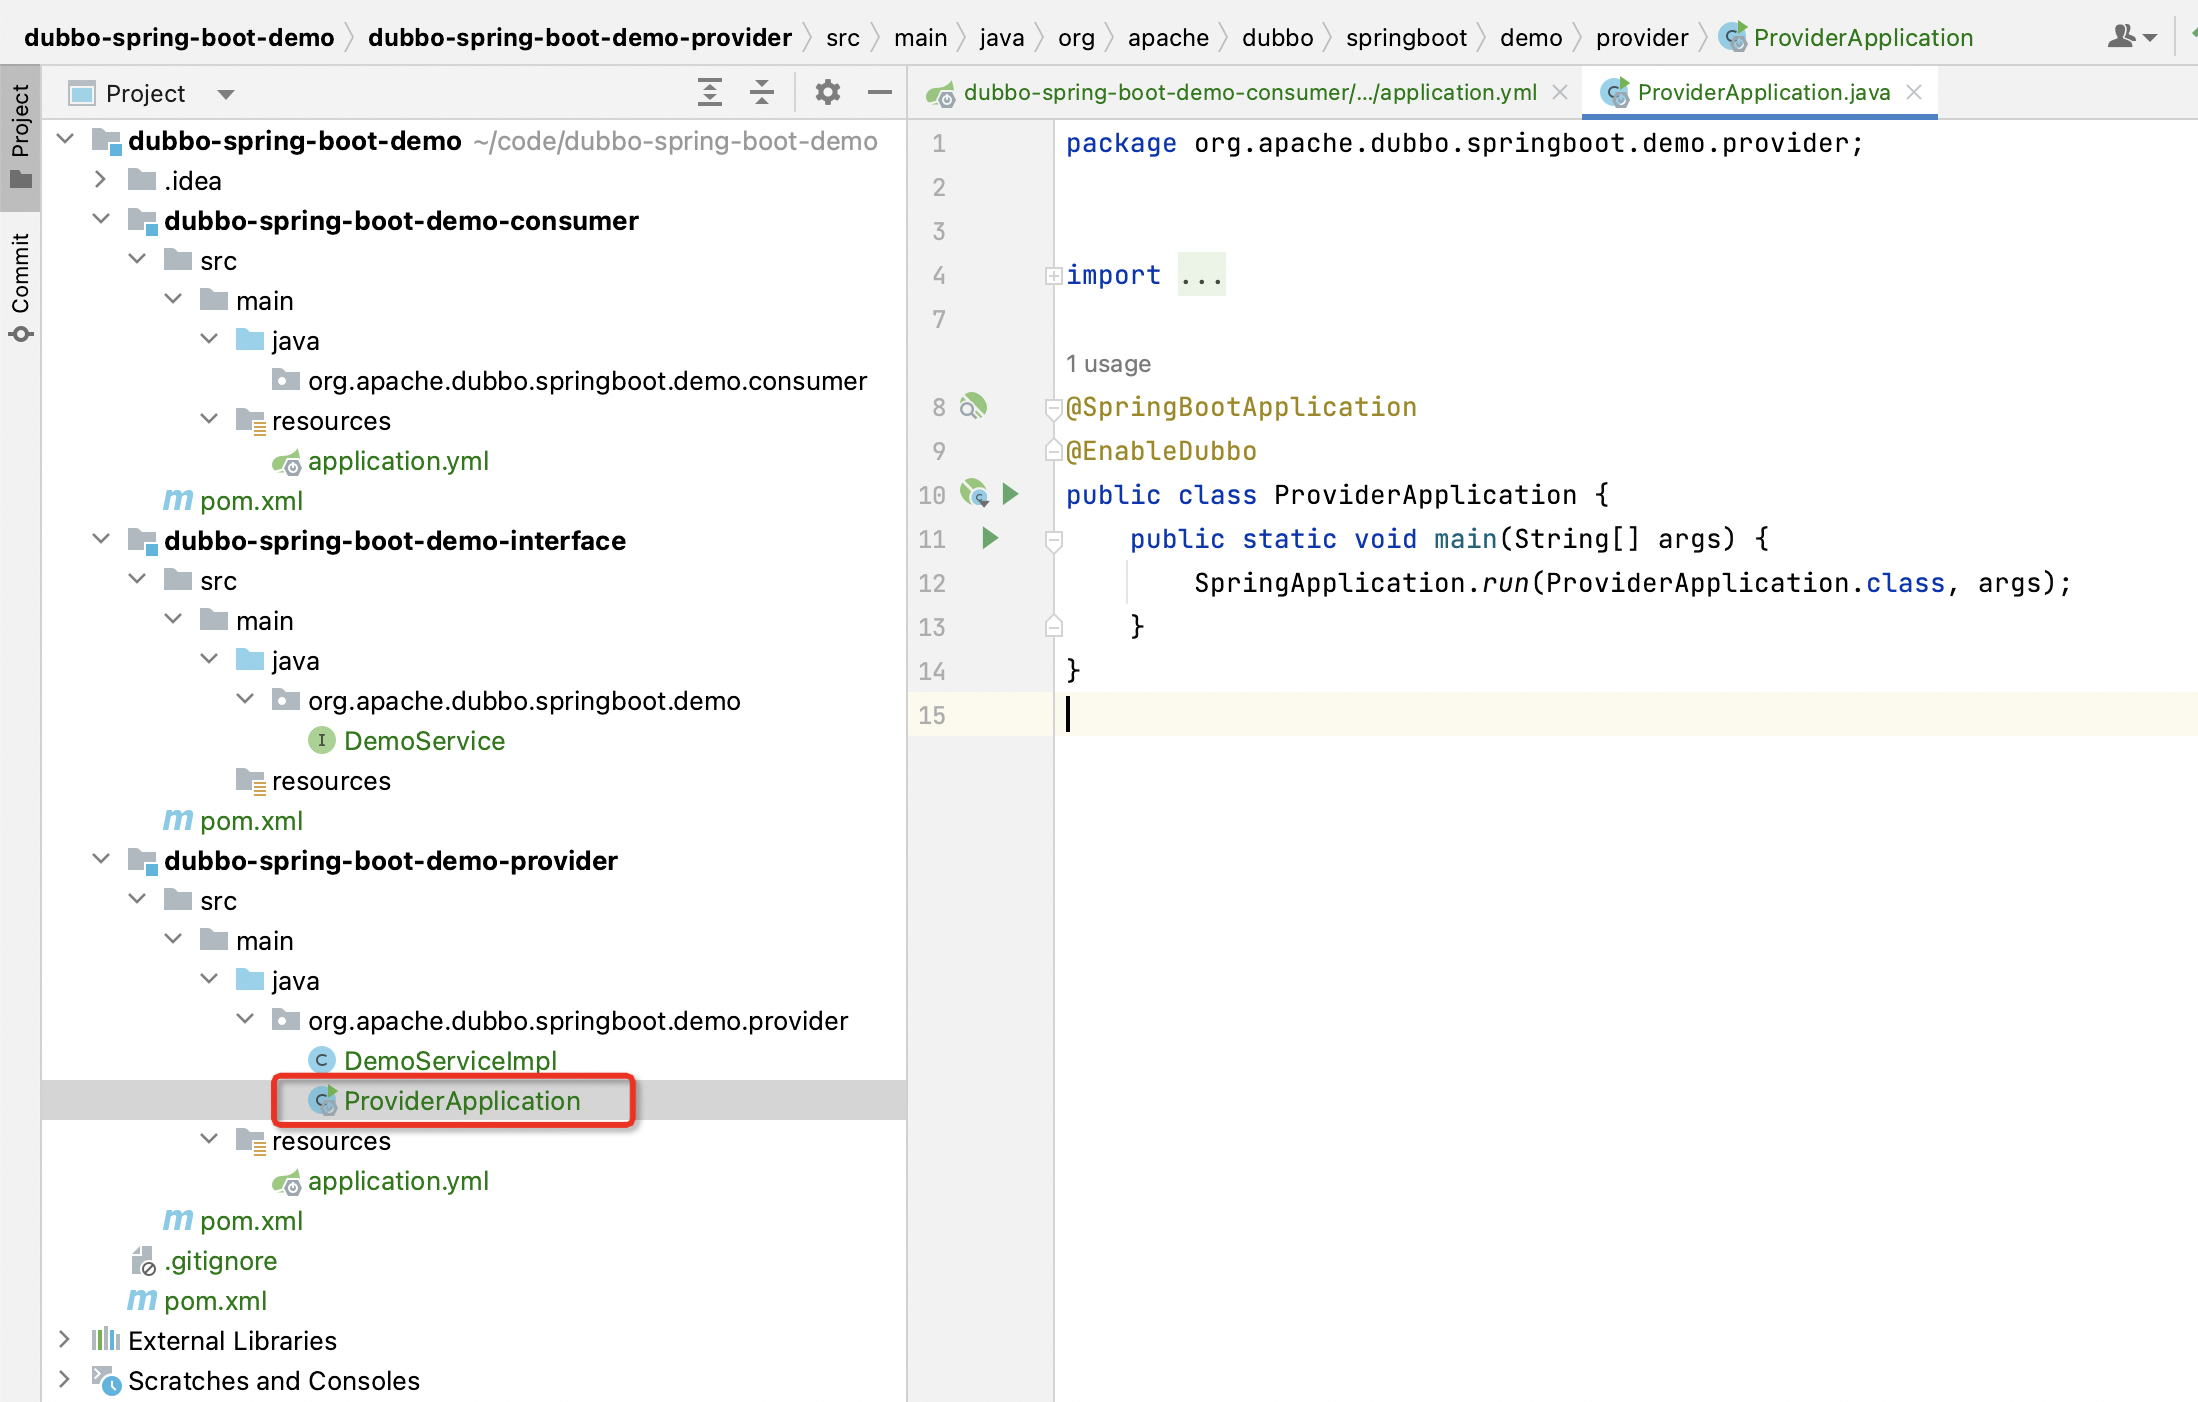
Create Application class under org.apache.dubbo.springboot.demo.provider of dubbo-spring-boot-demo-provider module, defined as follows:
package org.apache.dubbo.springboot.demo.provider;

import org.apache.dubbo.config.spring.context.annotation.EnableDubbo;
import org.springframework.boot.SpringApplication;
import org.springframework.boot.autoconfigure.SpringBootApplication;

@SpringBootApplication
@EnableDubbo
public class ProviderApplication {
    public static void main(String[] args) {
        SpringApplication.run(ProviderApplication.class, args);
    }
}
In this startup class, a ProviderApplication is configured to read the application.yml configuration file defined in step 6 above and start the application.
9. Configure consumer startup classes based on Spring
Similarly, we need to create a startup class for the consumer.
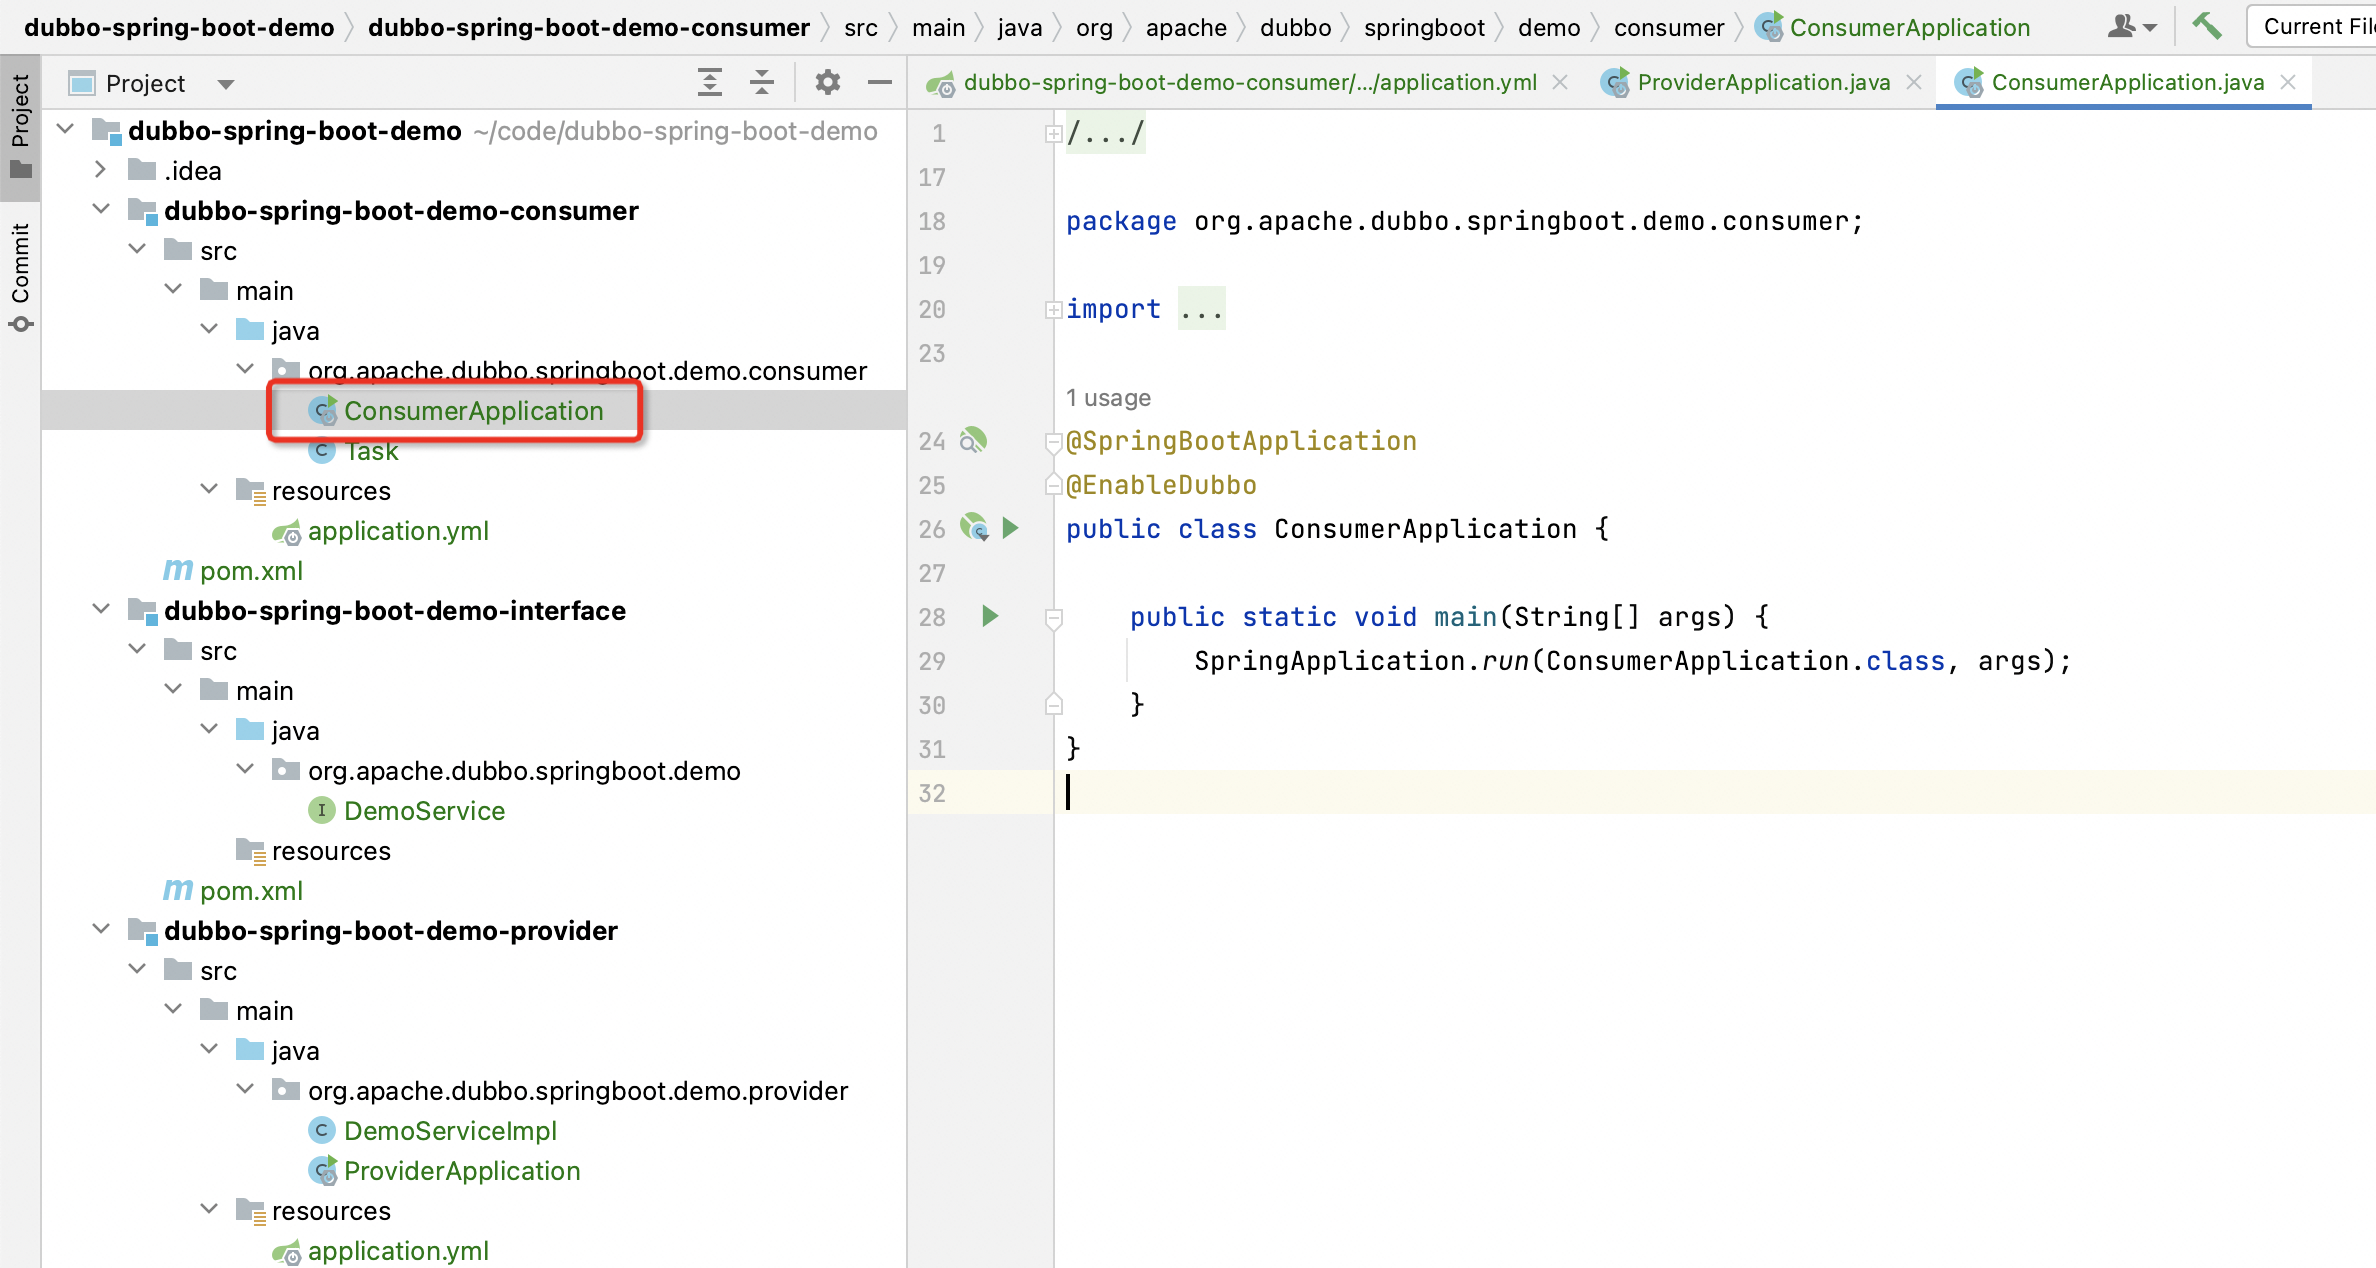
Create Application class under org.apache.dubbo.springboot.demo.consumer of dubbo-spring-boot-demo-consumer module, defined as follows:
package org.apache.dubbo.springboot.demo.consumer;

import org.apache.dubbo.config.spring.context.annotation.EnableDubbo;
import org.springframework.boot.SpringApplication;
import org.springframework.boot.autoconfigure.SpringBootApplication;

@SpringBootApplication
@EnableDubbo
public class ConsumerApplication {

    public static void main(String[] args) {
        SpringApplication.run(ConsumerApplication.class, args);
    }
}
In this startup class, a ConsumerApplication is configured to read the application.yml configuration file defined in step 7 above and start the application.
10. Configure consumer request tasks
In addition to configuring the startup class of the consumer side, we can also create it based on CommandLineRunner in Spring Boot mode

Create a Task class under org.apache.dubbo.springboot.demo.consumer of dubbo-spring-boot-demo-consumer module, defined as follows:
package org.apache.dubbo.springboot.demo.consumer;

import java.util.Date;

import org.apache.dubbo.config.annotation.DubboReference;
import org.apache.dubbo.springboot.demo.DemoService;
import org.springframework.boot.CommandLineRunner;
import org.springframework.stereotype.Component;

@Component
public class Task implements CommandLineRunner {
    @DubboReference
    private DemoService demoService;

    @Override
    public void run(String... args) throws Exception {
        String result = demoService. sayHello("world");
        System.out.println("Receive result ======> " + result);

        new Thread(()-> {
            while (true) {
                try {
                    Thread. sleep(1000);
                    System.out.println(new Date() + " Receive result ======> " + demoService.sayHello("world"));
                } catch (InterruptedException e) {
                    e.printStackTrace();
                    Thread. currentThread(). interrupt();
                }
            }
        }).start();
    }
}
In the Task class, an RPC subscription is obtained from Dubbo through @DubboReference, and this demoService can be called directly like a local call. A thread is created for the call in the run method.
11. Start the application
As of step 10, the code has been developed, and this section will start the entire project and verify it.
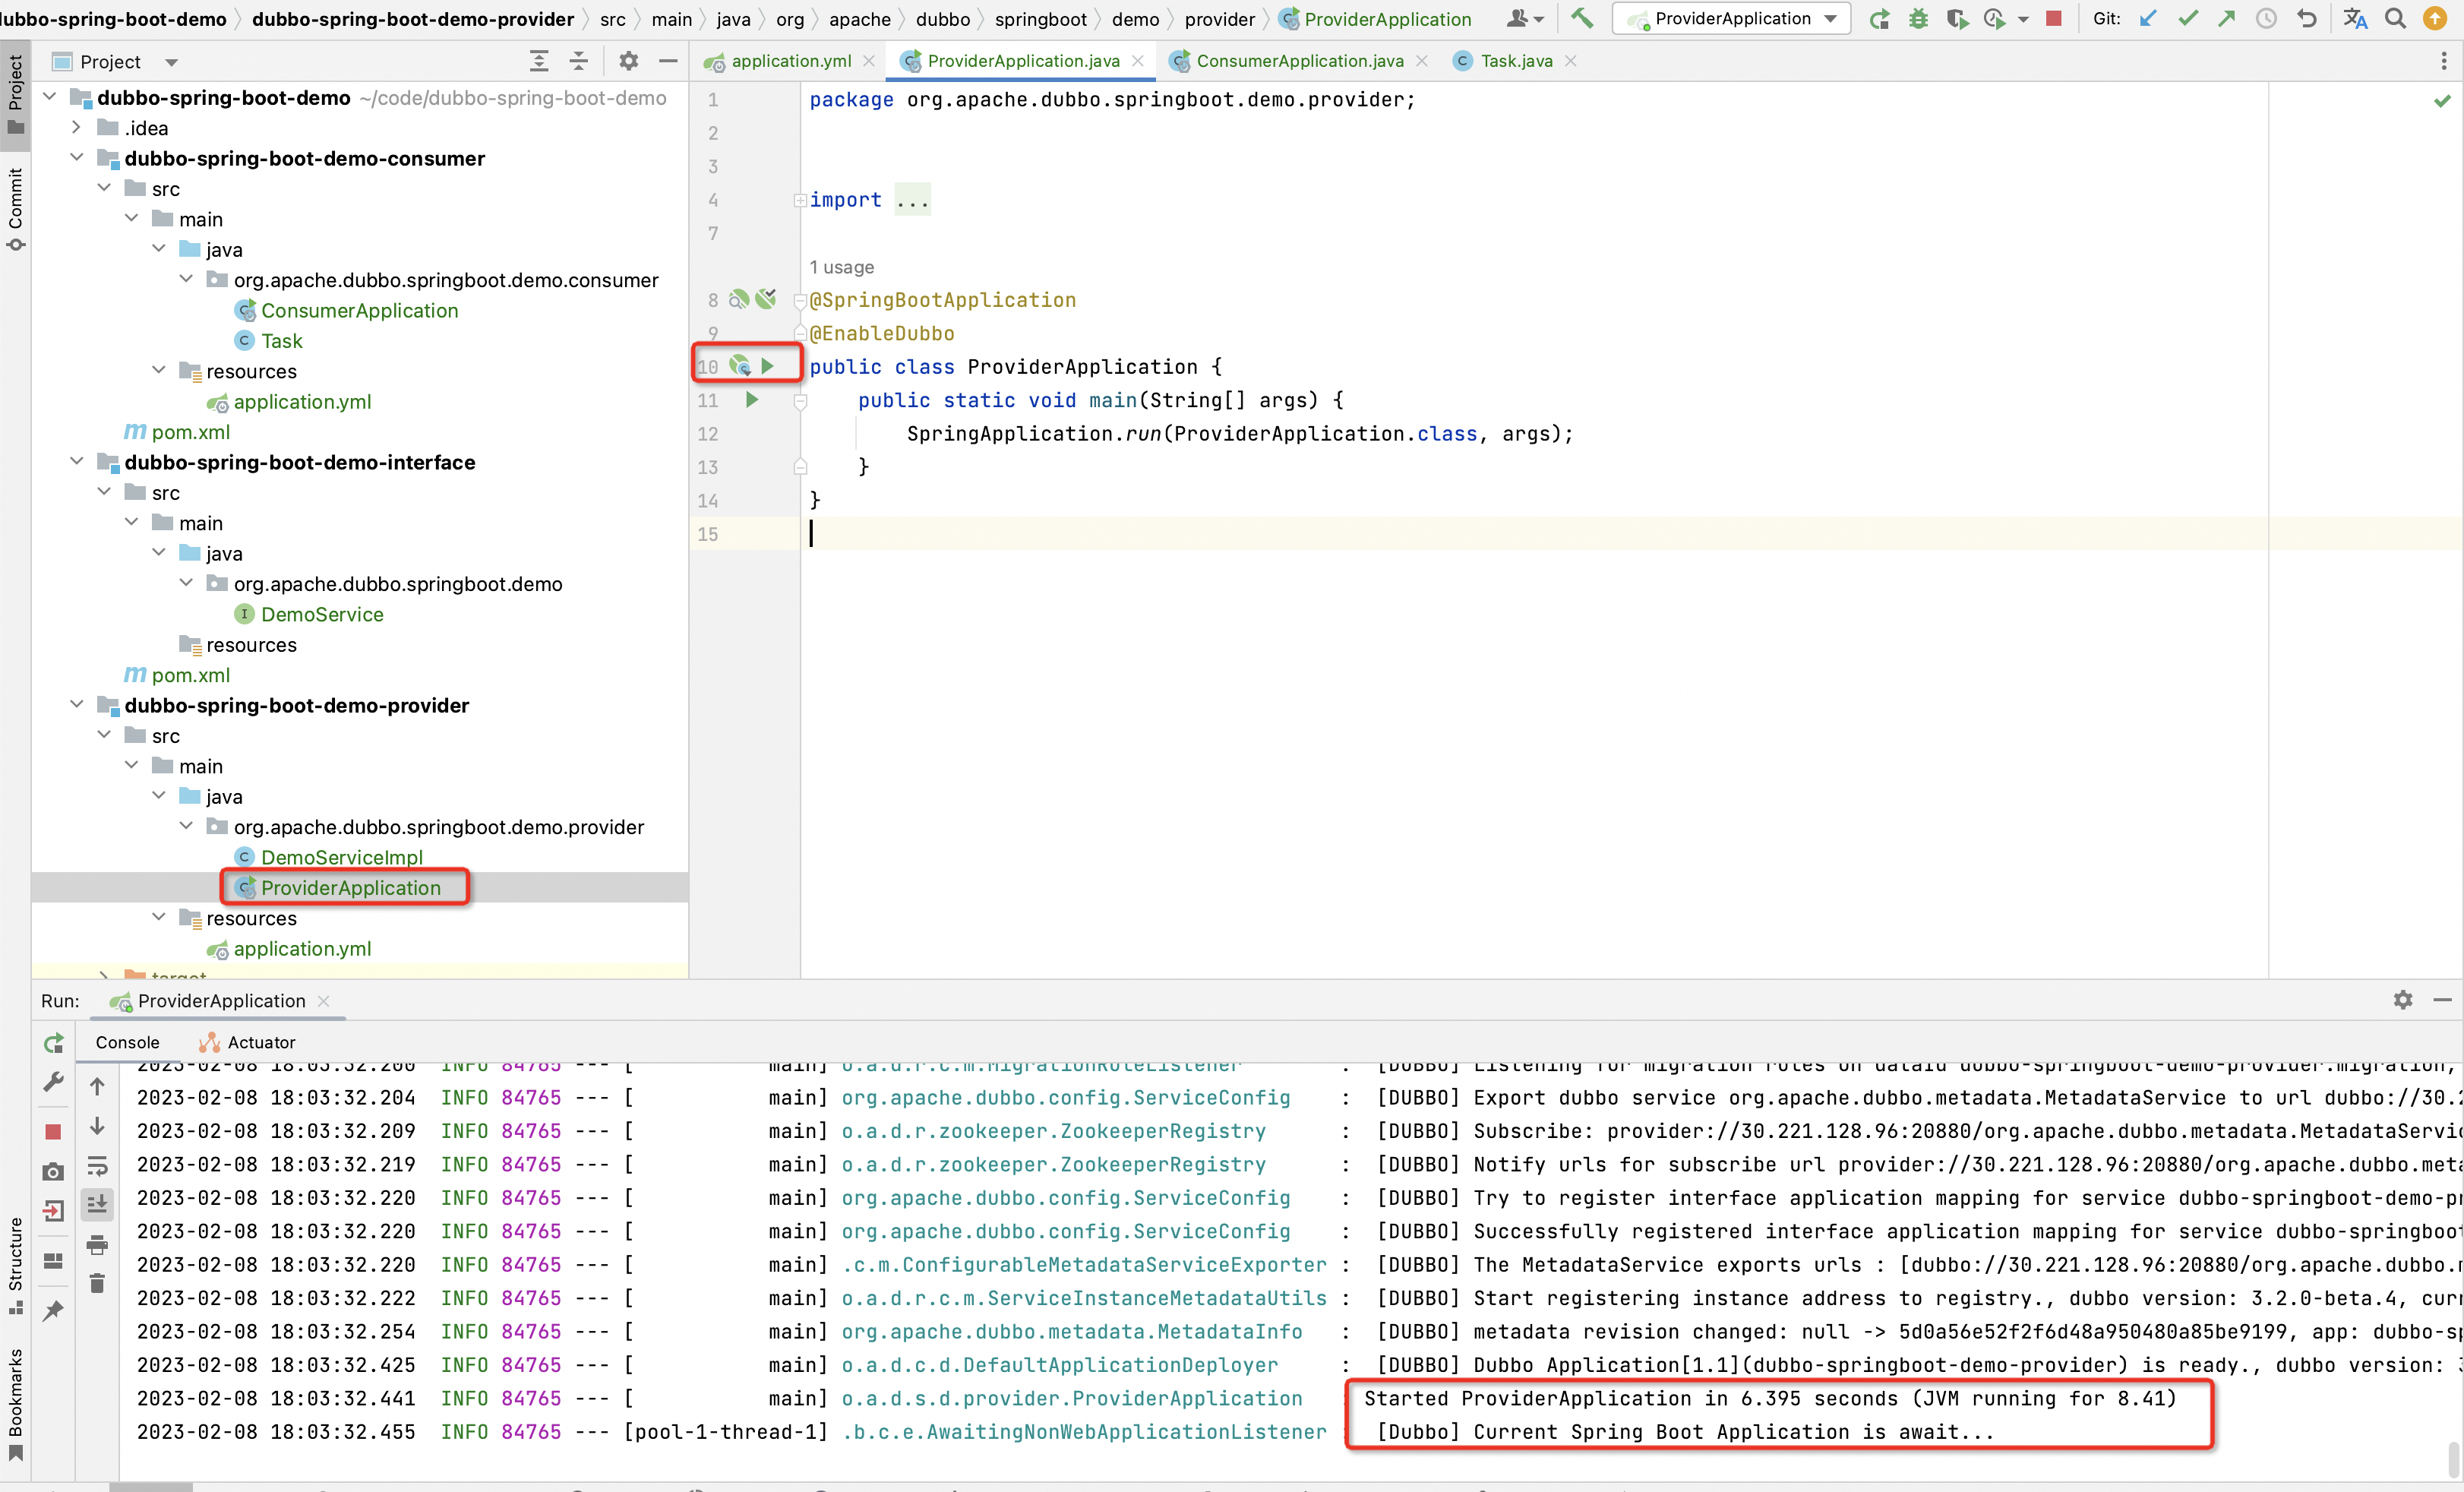
The first is to start org.apache.dubbo.samples.provider.Application, wait for a while to appear the log as shown in the figure below (Current Spring Boot Application is await), which means that the service provider has started, marking that the service provides can provide services externally.
[Dubbo] Current Spring Boot Application is await...
Then start org.apache.dubbo.samples.client.Application, and wait for a while to see the log (Hello world) as shown in the figure below, which means that the service consumer is started and the call to the server is successfully obtained.
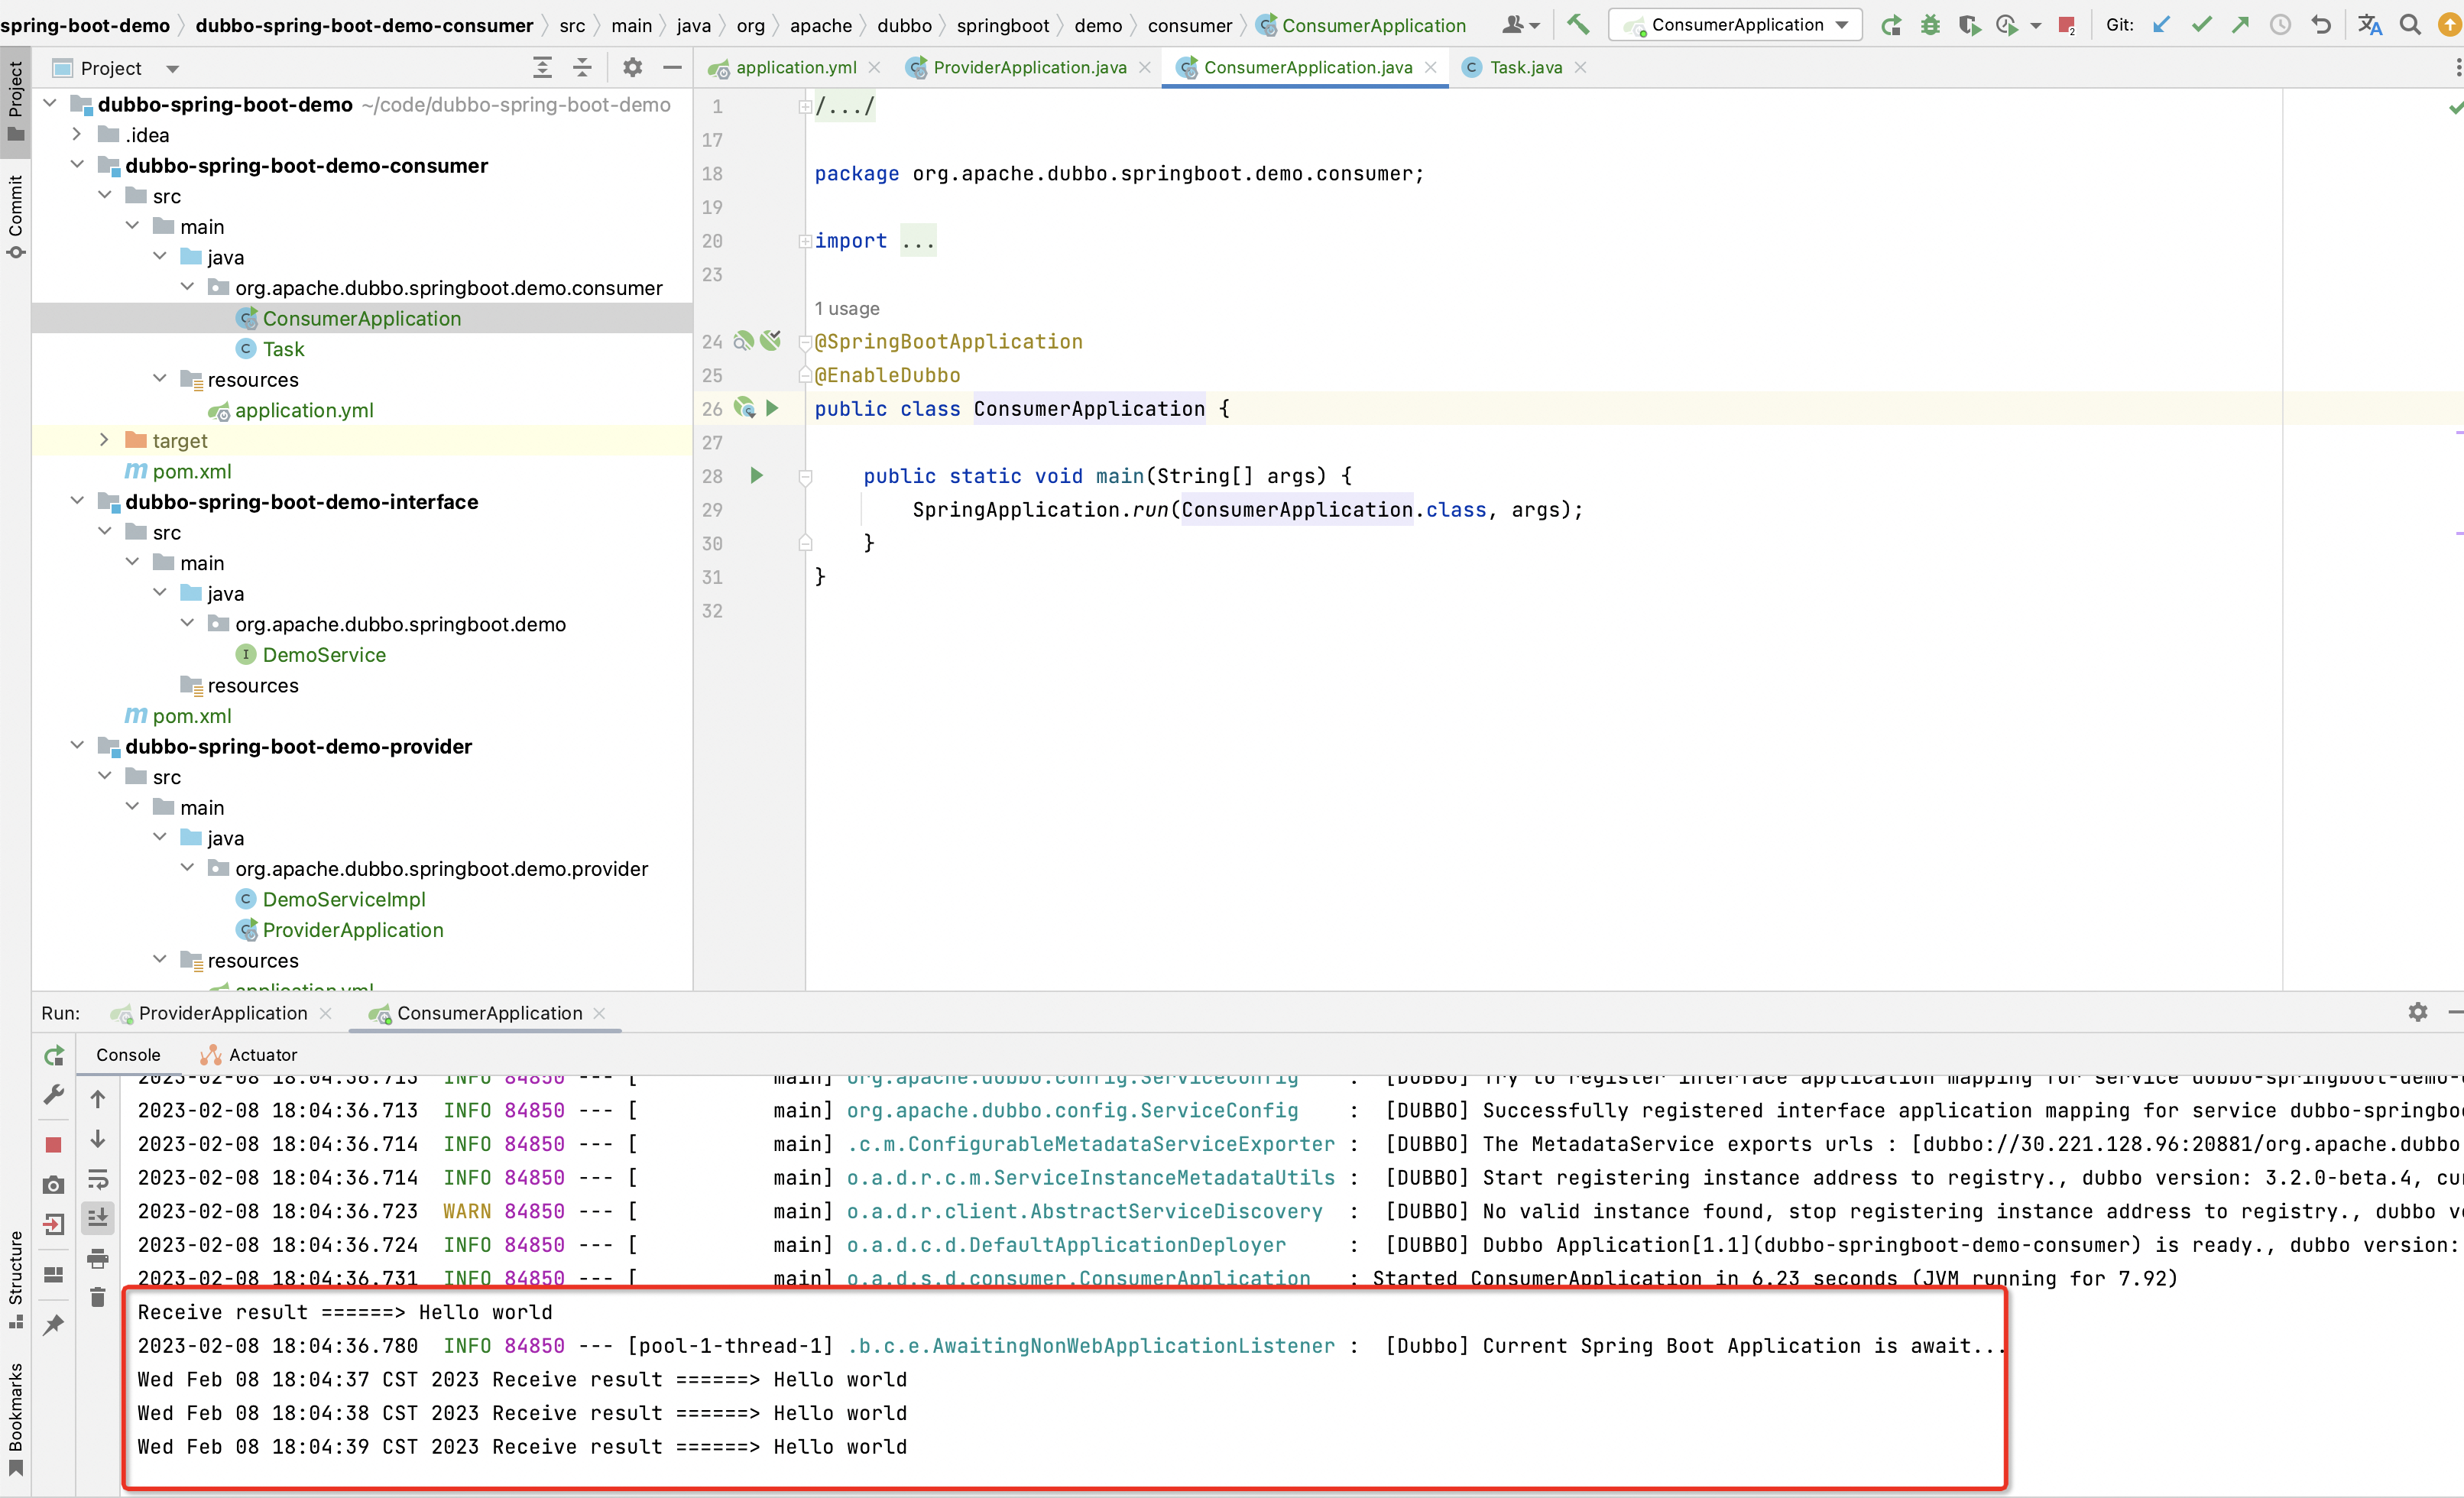
Receive result ======> Hello world
Further reading
1. Dubbo’s Spring configuration introduction
The main configuration entries of Dubbo include yaml configuration content, @DubboReference and @DubboService, etc. For more details, please refer to [Annotation Configuration | Apache Dubbo](/zh-cn/overview/mannual/java-sdk/reference-manual /config/annotation/) article.
More
This tutorial introduces how to develop a microservice application based on Dubbo x Spring Boot. In the next section, another Dubbo configuration method - Dubbo x Spring XML will be introduced.