Distributed Transactions
How to use
First step
First visit: https://seata.apache.org/unversioned/download/seata-server
Download the seata1.5.2 service we need to use
Second step
- Add the undo_log table to your database participating in global transactions (TCC, SAGA, XA can skip this step)
-- for AT mode you must to init this sql for you business database. the seata server not need it.
CREATE TABLE IF NOT EXISTS `undo_log`
(
    `branch_id` BIGINT(20) NOT NULL COMMENT 'branch transaction id',
    `xid` VARCHAR(100) NOT NULL COMMENT 'global transaction id',
    `context` VARCHAR(128) NOT NULL COMMENT 'undo_log context, such as serialization',
    `rollback_info` LONGBLOB NOT NULL COMMENT 'rollback info',
    `log_status` INT(11) NOT NULL COMMENT '0: normal status,1: defense status',
    `log_created` DATETIME(6) NOT NULL COMMENT 'create datetime',
    `log_modified` DATETIME(6) NOT NULL COMMENT 'modify datetime',
    UNIQUE KEY `ux_undo_log` (`xid`, `branch_id`)
) ENGINE = InnoDB
  AUTO_INCREMENT = 1
  DEFAULT CHARSET = utf8 COMMENT = 'AT transaction mode undo table';
- Create a library named seata in your mysql database, and use the following sql
-- -------------------------------- The script used when storeMode is 'db' ------- -------------------------
-- the table to store GlobalSession data
CREATE TABLE IF NOT EXISTS `global_table`
(
    `xid` VARCHAR(128) NOT NULL,
    `transaction_id` BIGINT,
    `status` TINYINT NOT NULL,
    `application_id` VARCHAR(32),
    `transaction_service_group` VARCHAR(32),
    `transaction_name` VARCHAR(128),
    `timeout` INT,
    `begin_time` BIGINT,
    `application_data` VARCHAR(2000),
    `gmt_create` DATETIME,
    `gmt_modified` DATETIME,
    PRIMARY KEY (`xid`),
    KEY `idx_gmt_modified_status` (`gmt_modified`, `status`),
    KEY `idx_transaction_id` (`transaction_id`)
) ENGINE = InnoDB
  DEFAULT CHARSET = utf8;

-- the table to store BranchSession data
CREATE TABLE IF NOT EXISTS `branch_table`
(
    `branch_id` BIGINT NOT NULL,
    `xid` VARCHAR(128) NOT NULL,
    `transaction_id` BIGINT,
    `resource_group_id` VARCHAR(32),
    `resource_id` VARCHAR(256),
    `branch_type` VARCHAR(8),
    `status` TINYINT,
    `client_id` VARCHAR(64),
    `application_data` VARCHAR(2000),
    `gmt_create` DATETIME(6),
    `gmt_modified` DATETIME(6),
    PRIMARY KEY (`branch_id`),
    KEY `idx_xid` (`xid`)
) ENGINE = InnoDB
  DEFAULT CHARSET = utf8;

-- the table to store lock data
CREATE TABLE IF NOT EXISTS `lock_table`
(
    `row_key` VARCHAR(128) NOT NULL,
    `xid` VARCHAR(96),
    `transaction_id` BIGINT,
    `branch_id` BIGINT NOT NULL,
    `resource_id` VARCHAR(256),
    `table_name` VARCHAR(32),
    `pk` VARCHAR(36),
    `gmt_create` DATETIME,
    `gmt_modified` DATETIME,
    PRIMARY KEY (`row_key`),
    KEY `idx_branch_id` (`branch_id`)
) ENGINE = InnoDB
  DEFAULT CHARSET = utf8;
third step
Introduce seata dependency into your project
spring-boot application:
            <dependency>
                <groupId>io.seata</groupId>
                <artifactId>seata-spring-boot-starter</artifactId>
                <version>1.5.2</version>
            </dependency>
spring application:
            <dependency>
                <groupId>io.seata</groupId>
                <artifactId>seata-all</artifactId>
                <version>1.5.2</version>
            </dependency>
the fourth step
spring-boot application:
Reference seata/script/client/spring at develop seata/seata (github.com)
Add it to your project’s application.yml.
seata:
  enabled: true
  application-id: applicationName
  tx-service-group: my_test_tx_group
  enable-auto-data-source-proxy: true #Only AT and XA modes need to be true, and the data source will be automatically proxied after opening
  data-source-proxy-mode: AT #Optional AT&XA
  config:
    type: nacos
    nacos:
      #namespace: If the configuration is created in a non-default namespace, please fill in the id of the namespace here
      serverAddr: 127.0.0.1:8848
      group: SEATA_GROUP
      username: "nacos"
      password: "nacos"
      data-id: seata.properties
  registry:
    type: nacos
    nacos:
      application: seata-server
      server-addr: 127.0.0.1:8848
      group: SEATA_GROUP
      #namespace: If the configuration is created in a non-default namespace, please fill in the id of the namespace here
      username: "nacos"
      password: "nacos"
spring application:
Add seata/script/client/conf at develop · seata/seata (github.com) under registry.conf, because High-availability deployment uses a third-party configuration center, so file.conf is not required
registry {
  # file, nacos, eureka, redis, zk, consul, etcd3, sofa, custom
  type = "nacos"
  nacos {
    application = "seata-server"
    serverAddr = "127.0.0.1:8848"
    group = "SEATA_GROUP"
    namespace = ""
    username = ""
    password = ""
    ##if use MSE Nacos with auth, mutex with username/password attribute
    #accessKey = ""
    #secretKey = ""
    ##if use Nacos naming meta-data for SLB service registry, specify nacos address pattern rules here
    #slbPattern = ""
  }
}

config {
  # file, nacos, apollo, zk, consul, etcd3, springCloudConfig, custom
  type = "nacos"
  nacos {
    serverAddr = "127.0.0.1:8848"
    namespace = ""
    group = "SEATA_GROUP"
    username = ""
    password = ""
    ##if use MSE Nacos with auth, mutex with username/password attribute
    #accessKey = ""
    #secretKey = ""
    dataId = "seata.properties"
  }
}
the fifth step
Run the nacos you downloaded, and refer to https://github.com/seata/seata/tree/develop/script/config-center and modify the config.txt
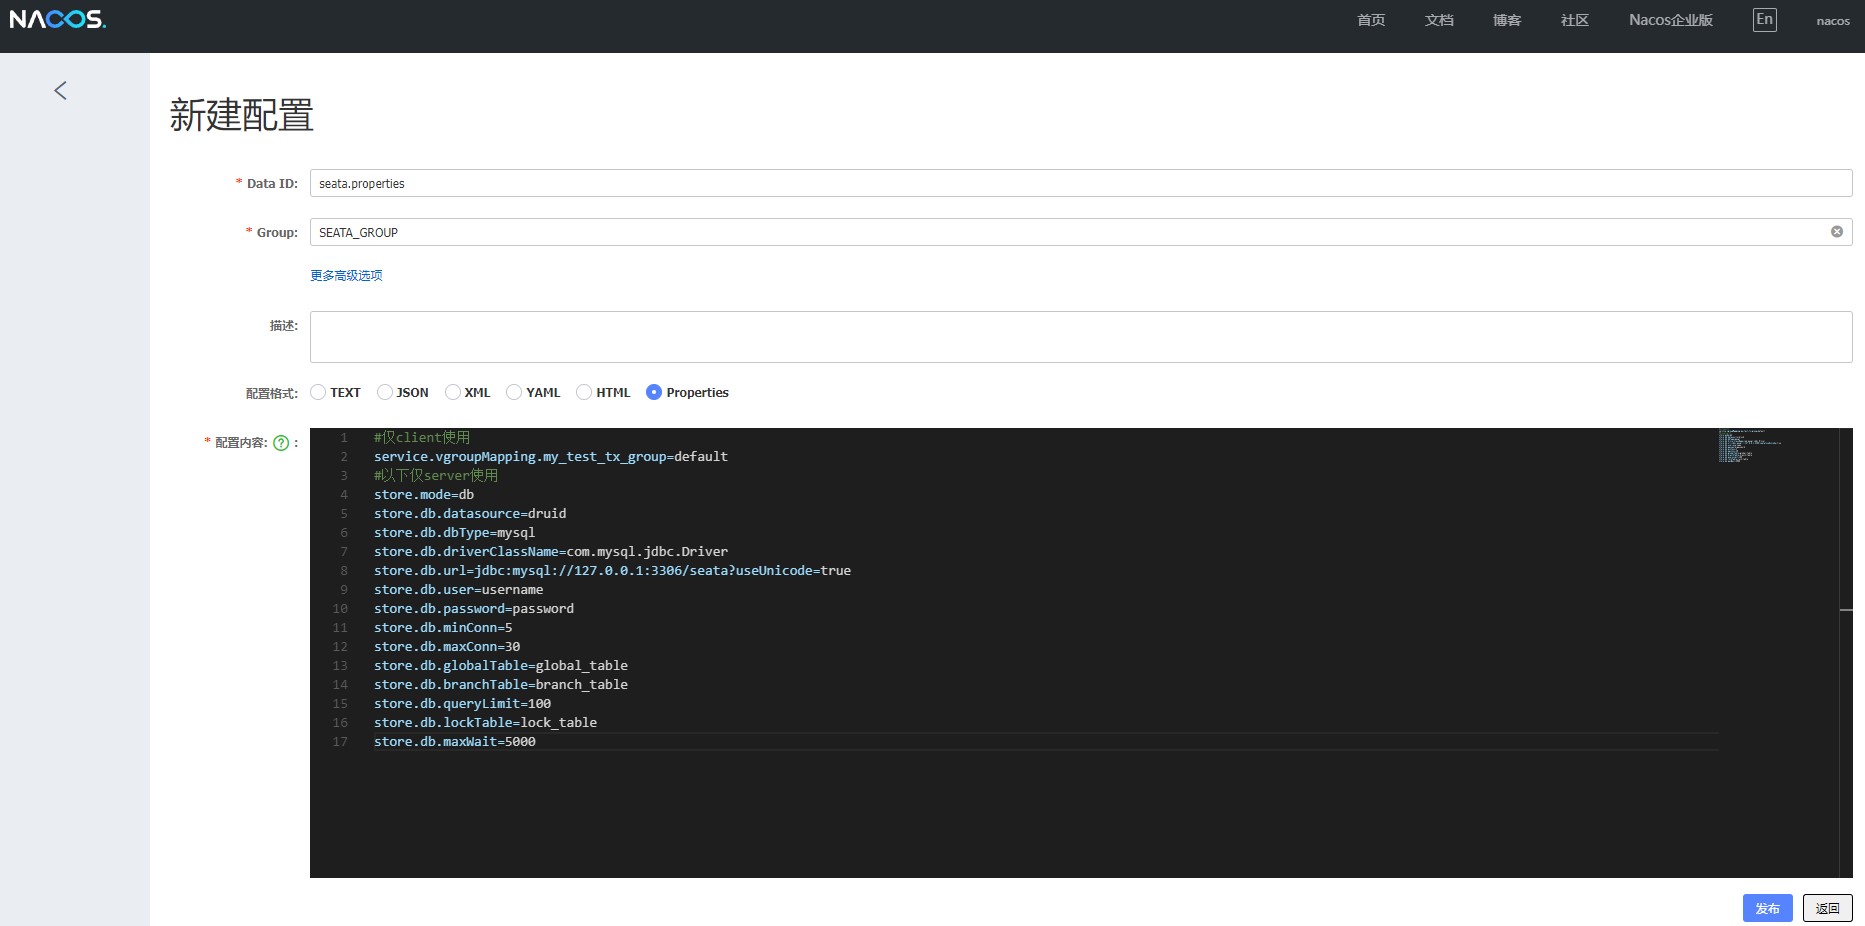
#Only used by client
#The transaction group is called my_test_tx_group and the corresponding seata-server cluster is default
service.vgroupMapping.my_test_tx_group=default
#The following are only used by server
store.mode=db
store.db.datasource=druid
store.db.dbType=mysql
store.db.driverClassName=com.mysql.jdbc.Driver
store.db.url=jdbc:mysql://127.0.0.1:3306/seata?useUnicode=true
store.db.user=username
store.db.password=password
store.db.minConn=5
store.db.maxConn=30
store.db.globalTable=global_table
store.db.branchTable=branch_table
store.db.queryLimit=100
store.db.lockTable=lock_table
store.db.maxWait=5000
Open the nacos console, create a configuration whose dataId is seata.properties under the corresponding namespace, fill in the group as SEATA_GROUP, and fill in the above content and select the type as properties to save
Step 6
Change application.yml in server
server:
  port: 7091

spring:
  application:
    name: seata-server

record:
  config: classpath:logback-spring.xml
  file:
    path: ${user.home}/logs/seata

console:
  user:
    username: seata
    password: seata

seata:
  config:
    # support: nacos, consul, apollo, zk, etcd3
    type: nacos
    nacos:
      server-addr: 127.0.0.1:8848
      #namespace: If the configuration is created in a non-default namespace, please fill in the id of the namespace here
      group: SEATA_GROUP
      username:
      password:
      ##if use MSE Nacos with auth, mutex with username/password attribute
      #access-key: ""
      #secret-key: ""
      data-id: seata.properties
  registry:
    # support: nacos, eureka, redis, zk, consul, etcd3, sofa
    type: nacos
    nacos:
      application: seata-server
      server-addr: 127.0.0.1:8848
      group: SEATA_GROUP
      namespace:
      cluster: default
      #namespace: If the configuration is created in a non-default namespace, please fill in the id of the namespace here
      password:
      ##if use MSE Nacos with auth, mutex with username/password attribute
      #access-key: ""
      #secret-key: ""
# server:
# service-port: 8091 #If not configured, the default is '${server.port} + 1000'
  security:
    secretKey: SeataSecretKey0c382ef121d778043159209298fd40bf3850a017
    tokenValidityInMilliseconds: 1800000
    ignore:
      urls: /,/**/*.css,/**/*.js,/**/*.html,/**/*.map,/**/*.svg,/**/*. png, /**/*.ico, /console-fe/public/**, /api/v1/auth/login
Step Seven
An example of adding @GlobalTransactional to the interface of the global transaction caller (the service that initiates the global transaction) is as follows:
@GetMapping(value = "testCommit")
@GlobalTransactional
public Object testCommit(@RequestParam(name = "id",defaultValue = "1") Integer id,
    @RequestParam(name = "sum", defaultValue = "1") Integer sum) {
    Boolean ok = productService. reduceStock(id, sum);
    if (ok) {
        LocalDateTime now = LocalDateTime.now();
        Orders orders = new Orders();
        orders.setCreateTime(now);
        orders.setProductId(id);
        orders. setReplaceTime(now);
        orders. setSum(sum);
        orderService. save(orders);
        return "ok";
    } else {
        return "fail";
    }
}
Spring applications need to manually proxy the data source to select the transaction mode and initialize the transaction scanner when using AT or XA mode
@Primary
@Bean("dataSource")
public DataSource dataSource(DataSource druidDataSource) {
    //AT agent choose one of the two
    return new DataSourceProxy(druidDataSource);
    //XA Proxy
    return new DataSourceProxyXA(druidDataSource)
}
       @Bean
       public GlobalTransactionScanner globalTransactionScanner() {
           return new GlobalTransactionScanner("application name", "my_test_tx_group");
       }
If you use tcc mode, you need to additionally define two-stage try and confirm(commit) cancel(rollback) in the serviceimpl of the corresponding provider
The spring-boot application needs to close the data source proxy
seata:
  enable-auto-data-source-proxy: false
/**
 * Define two-phase commit name = the bean name of the tcc, globally unique commitMethod = commit is the two-phase confirmation method rollbackMethod = rollback is the two-phase cancellation method
 * useTCCFence=true is to enable anti-hanging
 * BusinessActionContextParameter annotation to pass parameters to the second stage
 *
 * @param params - input parameters
 * @return String
 */
@TwoPhaseBusinessAction(name = "beanName", commitMethod = "commit", rollbackMethod = "rollback", useTCCFence = true)
public void insert(@BusinessActionContextParameter(paramName = "params") Map<String, String> params) {
    logger.info("You can reserve resources here, or use the characteristics of tcc to mix with AT. In the second stage, use the messages stored here in the first stage and send them out through the second stage, such as redis, mq and other operations");
}

/**
 * The confirmation method can be named otherwise, but it must be consistent with the commitMethod. The context can pass the parameters of the try method
 *
 * @param context context
 * @return boolean
 */
public void commit(BusinessActionContext context) {
    logger.info("Reserved resources are actually processed, or send mq messages and redis storage");
}

/**
 * Two-stage cancellation method
 *
 * @param context context
 * @return boolean
 */
public void rollback(BusinessActionContext context) {
    logger.info("Release reserved resources, or clear the message cache sent when the first phase is ready to be submitted by the second phase");
}
linux/macos
cd bin

sh seata-server.sh
windows
cd bin
./seata-server.bat
Run seata-server, after success, run your own service dubbo provider&consumer
The eighth step is to build a highly available Seata-server
Since seata-server supports the separation mode of computing and storage, and supports exposing service addresses to multiple registration centers, it only needs to be configured according to the sixth step and then expanded horizontally
For details, please visit: https://seata.io/